GOLFMK8
GOLFMK7
GOLFMK6
GOLFMKV

SIMPLE DIY cam follower check. DUMMY PROOF

awesome. good to hear.
 

airchina83

New member
Location
Seattle, WA
Thank you for the DIY!

First cam follower removal/replacement at 100,200miles on my 2008 Jetta GLI/FSI. After reading and seeing all the horror stories I was surprised that my cam lobe, pump, and follower/tappet looked decent for the mileage. I do not have a computer tune and only take it on spirited drives on the weekends, which may have explained the good wear. Thanks again for the write-up!
 

Attachments

  • photo 1.JPG
    photo 1.JPG
    156.9 KB · Views: 871
  • photo 2.JPG
    photo 2.JPG
    153.1 KB · Views: 780
  • photo 3.JPG
    photo 3.JPG
    156.6 KB · Views: 920

zmoclov21

Ready to race!
Location
Plymouth, Minnesota
Car(s)
06 cw 2 door dsg gti
I don't get it, I think you guys are way overreacting! If Cam Fowler is "SO BAD" then how'd he get on the US hockey team?? He can't be THat bad...

Sorry, lame, but I couldn't resist..


you guys are mean!
 

Mrrivest

Got a new engine free!
Location
Montreal
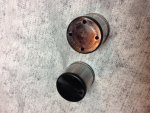
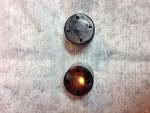
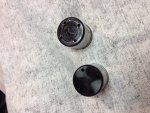
well fuck me, when i went to disconect the line , some how i broke a nipple off a coolant hose,
http://s1295.photobucket.com/user/taylor_robertson1/media/IMG_0449_zps1feec308.jpg.htmlhttp://s1295.photobucket.com/user/taylor_robertson1/media/IMG_0451_zpse3a1a202.jpg.html
anyone know where i could get a replacement?

I did the exact same thing, got hot coolant splash me in the face. Luckily my local car guy had that Y part in his garage, sold it to me for 10$. He saved me a lot of hassle.
 

Britishav8tor

Ready to race!
Location
Frederick MD.
Heres what happenedI to me

I have been putting this off and putting this off because I was worried something would get screwed up. Well I should have listened to my gut.
The disassemble went great - it was in fact really easy thanks to this write up and sure enough my cam follower was due to be changed (no black coating left). I put it back together spun the silver compression nut up and got it threaded all nice and then put what I felt was the same amount of force back on as was on there to begin with.
Hopped in ... waited cranked and it started up hooray I thought all that worry for nothing... not so fast. On closer inspection gas was dripping out around the the treads above the silver nut. I determined it wasnt coming from above and that it was squeezing up from the compression joint. No worries I thought maybe I didnt get it tight enough. well it was on there tight, I cracked a bit more and it seemed to make matter worse. So then I decided to take it all apart again, and check to make sure all the surfaces were clean. I cleaned them with cloth removing a fine film I removed the brass thing from pump (its not a PITA to get back in by the way). cleaning seemed to help but instead of dripping it wells up on the threads and sits there. Without a crows foot for my torque wrench I cant check the torque (ive ordered some) I also ordered the brass piece ($6 +$7 for shipping from ECS) the stealership wanted $14 plus tax. Mind you it will take 5 days for it to arrive. My only hope is that is not the stainless steal line as that looks like a real pain to get out from under the intake. Its been a stressful afternoon. Something that was supposed to be done in 1 hr dragged on for 5 :( Anyone else had this problem? Any suggestions ? Thanks.
 

Spectre

Ready to race!
Location
Atlanta
Very detailed DIY!

For me, I just use a 13mm wrench and take off the pressure valve then i use a 17 wrench and lossen the bottom nut, take off the sensor clip and use a T30 and unboltthe three torx screw and pull of the pump

Best post ever considering the OP's post. Hella funny. I know it wasn't your intention but still badsss.
 
I have been putting this off and putting this off because I was worried something would get screwed up. Well I should have listened to my gut.
The disassemble went great - it was in fact really easy thanks to this write up and sure enough my cam follower was due to be changed (no black coating left). I put it back together spun the silver compression nut up and got it threaded all nice and then put what I felt was the same amount of force back on as was on there to begin with.
Hopped in ... waited cranked and it started up hooray I thought all that worry for nothing... not so fast. On closer inspection gas was dripping out around the the treads above the silver nut. I determined it wasnt coming from above and that it was squeezing up from the compression joint. No worries I thought maybe I didnt get it tight enough. well it was on there tight, I cracked a bit more and it seemed to make matter worse. So then I decided to take it all apart again, and check to make sure all the surfaces were clean. I cleaned them with cloth removing a fine film I removed the brass thing from pump (its not a PITA to get back in by the way). cleaning seemed to help but instead of dripping it wells up on the threads and sits there. Without a crows foot for my torque wrench I cant check the torque (ive ordered some) I also ordered the brass piece ($6 +$7 for shipping from ECS) the stealership wanted $14 plus tax. Mind you it will take 5 days for it to arrive. My only hope is that is not the stainless steal line as that looks like a real pain to get out from under the intake. Its been a stressful afternoon. Something that was supposed to be done in 1 hr dragged on for 5 :( Anyone else had this problem? Any suggestions ? Thanks.

by 'brass thing' do you mean the check valve that the nickel plated copper (not stainless) compression fitting attaches to, or the pressure relief valve on the side?

The check valve has a crush washer on it. 10mm (ish) ID. if that is too far gone or missing you will have a hard time sealing it.

any auto parts store will have an assortment of brake fitting crush washers that includes one with the right thickness and inner diameter, and the wrong outer diameter, which will have to be filed down.

ask how i know.
 

gmmills

South African
Location
Atlanta, GA
Car(s)
CW GTI
^ dropped mine as well - luckily i found it. When butting the washer back in does it matte which way it goes? there is one side with an inner ring and the other is just flat. Which way should it be positioned?
 
The side with the inner ring is the side that's already been crushed by the check valve.

I'm not sure it matters. i'm currently using two copper washers that were too thin alone and have no leak.

I wonder if I'll find the thing on the belly pan next time i change the oil.

just make sure it's on there good and tight.
 

gmmills

South African
Location
Atlanta, GA
Car(s)
CW GTI
Great I figured it was that way so I put it in that way- just checking. I don't want my apr hpfp to fail . Appreciate the help.
 

Britishav8tor

Ready to race!
Location
Frederick MD.
Tim - thanks for replying. Ok so when I undid the silver fuel line that goes to the rail there was no crush washer there unless it's stuck in the nut there was no mention of a washer in the bently manual. When I removed the entire brass pressure relief valve from the hpfp I saw a little 10mm crush washer (which I almost lost) but the leak isn't at the union to the pump but the union to the silver rail fuel(nickel coated copper) line to the brass relief valve at the pump.

Here where I am now - my crows feet arrive tomorrow so I can see if I've just not torqued down enough (although it already feels tighter). My replacement pressure valve arrives Tuesday. I will disassemble it again and put the new valve in and try again. I had to drive 40+ miles and while the nut got damp there was no drip of gas on anything else.
 
Last edited:
Top