GOLFMK8
GOLFMK7
GOLFMK6
GOLFMKV

MK5 GTI on the Cheap

doc280

Ready to race!
Location
North Carolina
Ball Joints and Front Sway Bar Links Installed.

I installed the ECCPP ball joints and front sway bar links. The installation went as planned and the fitment of the parts was spot on. To let you know these parts are made in China, but the quality looks good and as I said the fit was also good. As far as longevity, time will tell. I did have to purchase a ball joint separator to complete this job.

I was going to buy the Detroit Axle ball joints because my purchase of their tie rod ends, had very good results. Detroit Axle has good prices and the are made in the USA, but their ball joints were not showing any of the mounting nuts and they failed to contact me when I reached out to ask about this. Reminded me of when I repeatedly reached out to APR about the tune on my blue car,..........crickets.

Though the old ball joints seemed ok, the new ball joints have got rid of a very slight vibration I had between 50 and 60mph.

These parts also did not stop the low speed deceleration clunk noise I have been hearing. But with the wheels off the ground and rotating the front wheels back and forth the sound appears to be coming from the gearbox. Almost seems like when I am coasting and the clutches disengage, there is some slack, which results in the sound.

I also discovered the left rear sway bar link has some slop in it and is making some noise when going over bumps. I have replacements on the way.

I installed a FSI emblem to the rear to balance the look.

ECCPP Ball Joints and Sway Bar Links.....Ebay.... $35.99
Ball Joint Separator Tool ... Advance Auto ... $8.49
FSI Emblem ................... Ebay ............$9.00

---------------------------------------------------------------
Cost / Maintenance ---------- $5013.44
Miles Driven -------------- 4711
------------------------------------------------
Cost Per Mile ---------------- $1.06
 

Attachments

  • IMG_20170620_145739-1024x768.jpg
    IMG_20170620_145739-1024x768.jpg
    228.3 KB · Views: 1,069
  • IMG_20170620_145543-1024x768.jpg
    IMG_20170620_145543-1024x768.jpg
    155.5 KB · Views: 1,065
  • IMG_20170620_145640-1024x768.jpg
    IMG_20170620_145640-1024x768.jpg
    128.8 KB · Views: 1,056
  • IMG_20170614_095737-1024x768.jpg
    IMG_20170614_095737-1024x768.jpg
    171.1 KB · Views: 1,054

ZiRiS

Sergeant
Location
Dallas, TX
Car(s)
'09 BMP GTI
That "FSI" badge looks pretty sweet. Admittedly, much better than I thought it would. I'm totally jealous now and might have to go find one for myself!

Sent from my LG-H918 using Tapatalk
 

doc280

Ready to race!
Location
North Carolina
That "FSI" badge looks pretty sweet. Admittedly, much better than I thought it would. I'm totally jealous now and might have to go find one for myself!

Sent from my LG-H918 using Tapatalk

Thanks.

I got it from eurobadgez on EBay. They have a best offer option and lowest bid accepted, I got, was $9.
 

doc280

Ready to race!
Location
North Carolina
Rear Links and Blood, to the Valdez Oil Spill.

I received the rear sway bar links and I must say they look great. Taking off the old ones required some addition work, than should be, because some idiot thought it was a great idea to use multi point star shaped thingys, at the end of the stud, which is used to hold the stud when removing and knowing it is going to be in an environment of water, grime, salt and other corrosive elements. I know, a run on sentence, but blood was spilled, just a small amount, but blood was spilled non the less. Noticed all the the updated suspension parts now have allens which should be better when removal is needed. I did end up using vise grips and a torch to remove the old links.

Ok, I am one who follows the manufactures recommended schedules for oil changes, but I had decided from the get go I would change the oil at 5000 miles. Use this oil change as kind of a flush. I am aware some change their oil at half the recommended schedule, but I have never run into any problems following what the manufacture has suggested. Also I have never liked the idea of putting something in my engine, to clean the insides, which is not a lubricant, makes me feel unsettled inside thinking about it.

I have not been adding oil to the GTI, I wanted to see how many miles I could drive until the oil level reached the min mark on the dip stick. The GTI made it 4017 miles before needing a quart.

Since I was so close to the 5000 mile mark of my ownership of the GTI, I would go ahead and change the oil. Also saved me from breaking the seal on a quart bottle.

Anyway I am following the instructions I have for changing the oil and I get to the point where I am draining the oil filter housing . Now I do not have the special tool to drain the housing, so the past two times I have performed this, I have used a 6mm rounded end allen and a large red Solo cup. The allen, insert, push in and push to an angle, catch oil in large red Solo cup. Ok this works fine, but it takes time just standing there filling the large red Solo cup.

So in my big brain, a great idea for a short cut was born. I could just fill the large red Solo cup up half way and the remainder of the oil would remain in the housing as I remove it and I would just pore it into the oil pan. STOP, don't do this. Oil went everywhere. I will break down and buy the tool for this before the next oil change.

Liqui Moly Oil 5w-40 5L ---- Ebay ---- $35.44
Mann oil filter --------------- Ebay ---- $11.95
Rein Rear Sway Bar Links-- Advance Auto --- $25.31

---------------------------------------------------------------------

Cost / Maintenance ---------- $5086.14
Miles Driven -------------- 4780
------------------------------------------------
Cost Per Mile ---------------- $1.06
 

Attachments

  • IMG_20170623_104646-768x1024.jpg
    IMG_20170623_104646-768x1024.jpg
    186.3 KB · Views: 1,023
  • IMG_20170623_104657-768x1024.jpg
    IMG_20170623_104657-768x1024.jpg
    163 KB · Views: 1,010
  • IMG_20170623_113503-1024x768.jpg
    IMG_20170623_113503-1024x768.jpg
    181.2 KB · Views: 1,008

doc280

Ready to race!
Location
North Carolina
Can I Paint....NO...NO....Holy Cow Batman, It Worked!

Three places on the GTI required some paint correction. Not saying the rest of the car is perfect, but these three stood out. So being the rest of the GTI is not perfect, I decided to do the corrections myself, using Dupli-Color Perfect Match........and I don't really know what I am doing, except for what I have read on the cans of paint and some You Tube videos. What could go wrong?

My first attempt was the rear left rocker where some paint had popped because of rust. I sanded the area to bare metal removing the rust. I masked of the area primed, sanded, primed and sanded, until I thought it was closed to perfect...lol. I then painted, cleared it and then waited the recommended time to wet sand it and buff it. Results, well my perfectly smooth area was not perfect. Biggest thing is the halo around the repaired area. I am sure someone here knows what caused this, but I think my masking caused the blending area to be to tight.

The second attempt was the right rear bumper which had been scuffed. Results were much better, however I believe I failed to keep the can shaken, because there is a lack of metal fake in the painted area. Looks as if there is a square shadow over the area.

The third attempt, the left rear quarter panel, a scratch which was all the way down to the primer. Ok this is where just about everything I had read went out the window. I had rolled the GTI out of the garage to look at where the scratch was. I had just sanded the area down to the primer and in the sunlight all looked very smooth. The temp was 90F and as I was feeling for imperfections the panel was getting hot. For some reason, most likely my impatience and the previous results, I changed how I as doing things. In the hot sun, I skipped the primer and masking the area, shook the paint can violently and painted the area and cleared it. 48 hours later I wet sanded it and buffed it. Look at the photo other than a little orange peel it blended perfect and the color match is spot on. I could have more than likely sanded and buffed a little more and got the very slight orange peel out but I became afraid of messing it all up.


3M Moulding Tape ... Advance Auto ... $12.99
Masking Paper ... Harbor Freight ... $3.99
Paint Mask ... Harbor Freight ... $1.99
Dupli-Color Perfect Match Primer ... Advance Auto ... $7.99

--------------------------------------------------------------------------

Cost / Maintenance ---------- $5113.10
Miles Driven -------------- 5049
------------------------------------------------
Cost Per Mile ---------------- $1.01
 

Attachments

  • IMG_20170525_085941-1024x768.jpg
    IMG_20170525_085941-1024x768.jpg
    165.1 KB · Views: 995
  • IMG_20170703_115630-1024x768.jpg
    IMG_20170703_115630-1024x768.jpg
    172.5 KB · Views: 977
  • IMG_20170629_112810-1024x768.jpg
    IMG_20170629_112810-1024x768.jpg
    156 KB · Views: 985
  • IMG_20170706_084543-1024x768.jpg
    IMG_20170706_084543-1024x768.jpg
    152.9 KB · Views: 989
  • IMG_7759_zpsm1p3g4hu_kindlephoto-65315472-1024x767.jpg
    IMG_7759_zpsm1p3g4hu_kindlephoto-65315472-1024x767.jpg
    78.6 KB · Views: 981
  • IMG_20170703_115718-1024x768.jpg
    IMG_20170703_115718-1024x768.jpg
    158.2 KB · Views: 977

doc280

Ready to race!
Location
North Carolina
Headliner Takes A Large Dump.

Well I just got bit by the all to familiar crappy material VW used for their headliners. I knew it would only be a matter of time, seeing the problem in many of the MK4's and MK5' I have looked at.

Ok, not a big deal, as I pass a shop which advertises $59 headliner replacements. Now I really did not believe this, so I set my budget at $200. Well the shop quoted $300 and when I asked what qualified for the $59 headliner, I was told "not that" as he pointed at the GTI. Went to three shops and the price just kept getting worse, so time for a DIY.

The matching anthracite material, I located was $75 and black was less than half that cost, so black it is.

So armed with instructions on how to remove the headliner and a youtube video on how to cover the headliner board, I got to the fun. Yea right, fun, nope this is work and the only enjoyable part of it was when I realized I was finished. Removing the headliner is not easy and putting it back is a lot worse. Got to give the guy on youtube credit, he made everything look so easy, recovering the headliner board. He provided the information needed to cover the board, but the underlining fact is, he has skill.

So got it all complete and there are a few imperfections, but unless your looking for them, you would not see them. For less then 50 bucks, I am very happy. So how much would I charge to do this for someone? Not going to happen.

Black Headliner Fabric ----- Ebay ---- $34.95
Permatex Headliner Adhesive --- Advance Auto ---- $11.99
Wire Brush ---- Harbor Freight ----- $1.99

________________________________________________

Cost / Maintenance ---------- $5162.03
Miles Driven -------------- 5977
------------------------------------------------
Cost Per Mile ---------------- $0.86
 

Attachments

  • IMG_20170809_143839-1024x768.jpg
    IMG_20170809_143839-1024x768.jpg
    189 KB · Views: 970
  • IMG_20170809_161204-768x1024.jpg
    IMG_20170809_161204-768x1024.jpg
    141.8 KB · Views: 969
  • IMG_20170809_154839-1024x768.jpg
    IMG_20170809_154839-1024x768.jpg
    177.7 KB · Views: 976
  • IMG_20170809_114705-1024x768.jpg
    IMG_20170809_114705-1024x768.jpg
    196.5 KB · Views: 967
  • IMG_20170809_114649-1024x768.jpg
    IMG_20170809_114649-1024x768.jpg
    111.1 KB · Views: 973
  • IMG_20170809_162653-1024x768.jpg
    IMG_20170809_162653-1024x768.jpg
    255 KB · Views: 974
  • IMG_20170811_104749-1024x768.jpg
    IMG_20170811_104749-1024x768.jpg
    113.4 KB · Views: 974
  • IMG_20170811_104947-1024x768.jpg
    IMG_20170811_104947-1024x768.jpg
    142.4 KB · Views: 974

baynehh

New to the game.
Location
Houston, TX
Car(s)
2009 GTI
Looks great! I am needing to do this but absolutely dreading the thought. Will definitely be postponing until we have cooler weather down here in TX
 

doc280

Ready to race!
Location
North Carolina
Thanks guys.

Two things I would have done different and something to keep in mind.

One: Put down a drop cloth before steel brushing the old foam off the board. the rotten foam is sticky and when it falls on the floor and you step on it, the foam will stick to the floor and it will require being scraped off.

Two: Have a second person hold up the material and attach and smooth it out working from the center to the sides. I had only myself and it was difficult for me to handle both jobs simultaneously.

All the clips VW uses is a pain and I would think there could be an easier way to do it. But maybe there is a reason for the madness, i mean there are airbags everywhere in this car. Starting to think I would feel safer with a roll bar crash structure, then all these exploding bags around me.
 

doc280

Ready to race!
Location
North Carolina
Very Cool Oil Filter Drain Tool.

A very nice guy Lou, offered this very nice oil filter housing drain tool, for just the cost of shipping. Who the hell does nice things like this these days? Well maybe there is hope for the world. And everyone should thank Lou, because he may have saved the planet. You guys should have seen all the paper towels I used to clean up all the spilled oil, the last time I changed the oil.

Thank you very much Lou.
--------------------------------------------------------------------
Cost / Maintenance ---------- $5170.68
Miles Driven -------------- 6738
------------------------------------------------
Cost Per Mile ---------------- $0.77
 

Attachments

  • IMG_20170907_181707-768x1024.jpg
    IMG_20170907_181707-768x1024.jpg
    184.8 KB · Views: 859

doc280

Ready to race!
Location
North Carolina
What does man juice, a blow torch and headliner material have in common?

Well did you guess? Refinishing a GTI center door panel section.

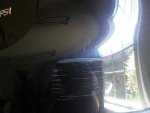
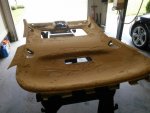
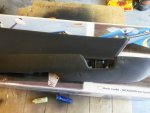
Since purchasing the GTI the cloth section of the drivers door panel looks as if there is man juice on it. Yes I have cleaned it, steamed cleaned it and still it looks like spludge has been ejacu....... well you should have the idea.

So since replacing the headliner, I have acquired some super serious mad upholstery skills, so what the hell, lets go out in the garage and recover that nasty door panel.

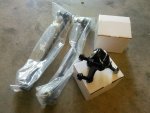
I had some left over material from the headliner and it was very easy to find a DIY on how to remove the door panel...... opps the guy, in the DIY, has a thick Russian accent, so am I wondering..........if I colluded?

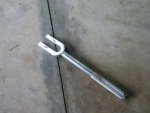
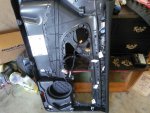
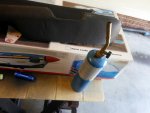
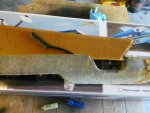
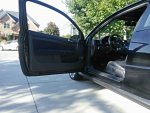
Anyway with the door panel removed, I soon realized, I could not find a DIY video on how to remove the center panel. So after close examination I came to the conclusion the best way to to separate the center section from the door panel was a blow torch, a propane blow torch. Yes you read correctly and here is the reason why. The center panel, when being attached to the door panel, during manufacturing, was attached with heat and pressure. So by prying with my interior pry tool and heating the attachment points, with the blow torch, the center section, soon detached from the door panel. Cool, hope it will go back together.

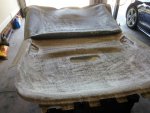
I pulled the jizzed covered material from the center section and used the wire brush, I purchase for the headliner replacement, to remove the foam. Wear gloves if you attempt this, not because of the organic fluid, the foam is rotten and sticky, it will also stick to the floor. I went outside, in the yard, to remove the foam. Damn, hope the foam does not kill, by professionally cut and striped, MLB quality lawn.

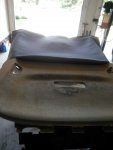
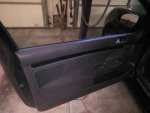
Once again let me tell you, using my insanely mad upholstery skills, I applied the new headliner material to the center section.

After the center section laid in the sun for two hours getting a tan, ......the heat seams to smooth the material out, it was ready to be reattached to the door panel.

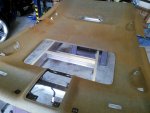
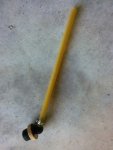
Now reattaching required the blowtorch again, also I used a 1/2 inch extension. How this worked, I placed the center section back in to the door panel, there are a few centering pins. Then I heated each attachment point, one at a time, when hot, just a few seconds. I held the center panel in place while pressing and turning, the heated area, with the 1/2 extension, until cool.

Holy reattachment, Batman...it worked.

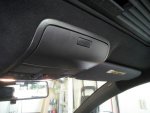
So now I have this beautiful black center driver's door panel, which I think looks great. Bad news.....I lack having enough material to do the passenger side door panel, by a whooping 3/4 of an inch.....son of a biscuit.

Cost of this job ......nothing, but I need a yard of material, to do the passenger side and the seller I got the material from only sales larger than one yard.
 

Attachments

  • IMG_20170908_124238-768x1024.jpg
    IMG_20170908_124238-768x1024.jpg
    117.2 KB · Views: 974
  • IMG_20170908_121035-1024x768.jpg
    IMG_20170908_121035-1024x768.jpg
    213.5 KB · Views: 937
  • IMG_20170908_121145-1024x768.jpg
    IMG_20170908_121145-1024x768.jpg
    176.6 KB · Views: 947
  • IMG_20170908_121135-1024x768.jpg
    IMG_20170908_121135-1024x768.jpg
    167.9 KB · Views: 938
  • IMG_20170908_122338-1024x768.jpg
    IMG_20170908_122338-1024x768.jpg
    240.5 KB · Views: 931
  • IMG_20170908_161946-1024x768.jpg
    IMG_20170908_161946-1024x768.jpg
    239.2 KB · Views: 940
  • IMG_20170908_165241-1024x768.jpg
    IMG_20170908_165241-1024x768.jpg
    130.2 KB · Views: 946
  • IMG_20170908_171847_kindlephoto-112671106-1024x768.jpg
    IMG_20170908_171847_kindlephoto-112671106-1024x768.jpg
    243.3 KB · Views: 945
Top