2wdBlazer
Ready to race!
- Location
- Sylvania (Near Toledo) OH
I figure with all the drama that went on with the Eurojet thread and lack of solid instructions I would post. Picking through the thread and finally adding to Eurojet's website was some info which to a first time installer such as myself, was not super clear and helpful.
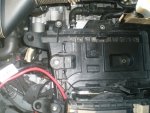
ENGINE BAY
1)Remove the battery.
2)Remove the battery box completely
3)Take the engine cover off.
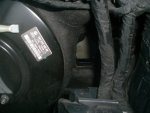
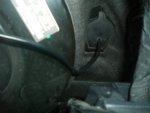
4)When the battery box is removed a ruber Round-ish plug is clearly visible and esily popped out ith your finger from the inside of the car. (my car is a DSG so I am unsure if this plug is reserved for a manual tranny or not. If so there is other places to feed through but this is the easiest.
5)Drill a small hole or punch a hole once this plug is in your possession large enough for the longer electronic wire.
6)Feed the the wire through and pop the plug back in.
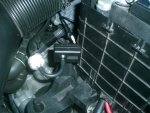
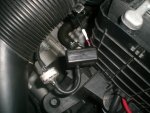
7)At this point I installed my 42DD tap not included of course but thats another DIY thread. It's easy though.
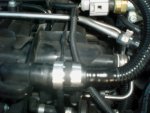
8)Run a hose from the tap to the Electronic sender. Sender should be fairly close to the TAP.
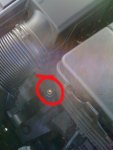
9)Mount the Sender to the mystery threaded hole that is on the battery box. ( I know you've said "hey, I wonder what that hole is for") Here is your chance to use it. (I have a drwer full of bolts and nuts I save whenever I take shit apart)
10)Make sure you mount the filter inline between the tap and sender.
11)Tighten up the massive slack on the electical cord towards the cabin, leave a little slack. You are done with the engine bay.
INTERIOR
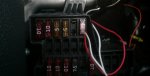
12)Open the driver door and take off the gray plastic fuse box cover
13) Pop out the headlight switch (push in and twist clockwise than pull) and unclip the wiring harness.
14) Remove he paneling around the headlight switch. Theres 4 torx screws (I think T20). Two are down in the footwell (they face the driver seat). One is in the hole where the headlight switch was and One is under the plastic piece above the steering wheel mount (just pull it, its clipped on.
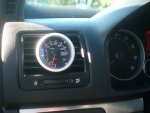
15)Remove the vent. I used a tiny flat head screwdriver. The bottom end should pop out and you should be able to wiggle the rest out.
16)Now take the vent, remove the oem cover and angling fins inside. Do not forget the fins as I fiddled with this for about 20 minutes trying to figure out why it almost fit.
17)Cut a small hole in the side of the vent box somewhere so that you can pass the two wires through and connect to the new gauge which you should mount now and connect the wires.
18)Put the vent back in.
19)Take the shorter wire with the 4 open ends and open about 6 inches of the black covering exposing the 4 wires, it will make your life easier.
WIRING (this was the confusing part and why I started this thread as the solution for the blue was difficult to find and Eurojet released nothing for about a week)
20)Black is ground and can be wrapped around about any metal bolt in the area.
21)Red and White wires into a fuse slot in the top row of the fuse box. Use a spare fuse to hold the wires in place.
22)Orange wire splices it into the gray wire that goes into the #10 spot on the headlight switch harness. That is the SOLID Grey wire. The other Grey wire has a stripe and is not correct.
23)If you attemt to try out the gauge to test before buttoning everything up, It must have the dimmer plug connected and be at full level or the gauge will flash colors and not work.
24)It should be white till you flip the headlights on then it should turn Blue. If it does not check your wiring and plug connections and that dimmer switch.
25)Put your interior back together.
Personally do not like the brightness of this gauge at night as it is literally 2 or 3x brighter than stock. I believer there is a slight drain on the factory gauges dimming them a little. I am not satisfied as it is very distracting.
The Vent pod should have been angled towards the driver as it is a bit hard to read. If I can pick up an AWE vent I will switch this as I will live with the Brightness of the sun but the angle irritates me.
I did forget to take some pics along the way but i hope what I did snap will be helpful.
ENGINE BAY
1)Remove the battery.
2)Remove the battery box completely
3)Take the engine cover off.
4)When the battery box is removed a ruber Round-ish plug is clearly visible and esily popped out ith your finger from the inside of the car. (my car is a DSG so I am unsure if this plug is reserved for a manual tranny or not. If so there is other places to feed through but this is the easiest.
5)Drill a small hole or punch a hole once this plug is in your possession large enough for the longer electronic wire.
6)Feed the the wire through and pop the plug back in.
7)At this point I installed my 42DD tap not included of course but thats another DIY thread. It's easy though.
8)Run a hose from the tap to the Electronic sender. Sender should be fairly close to the TAP.
9)Mount the Sender to the mystery threaded hole that is on the battery box. ( I know you've said "hey, I wonder what that hole is for") Here is your chance to use it. (I have a drwer full of bolts and nuts I save whenever I take shit apart)
10)Make sure you mount the filter inline between the tap and sender.
11)Tighten up the massive slack on the electical cord towards the cabin, leave a little slack. You are done with the engine bay.
INTERIOR
12)Open the driver door and take off the gray plastic fuse box cover
13) Pop out the headlight switch (push in and twist clockwise than pull) and unclip the wiring harness.
14) Remove he paneling around the headlight switch. Theres 4 torx screws (I think T20). Two are down in the footwell (they face the driver seat). One is in the hole where the headlight switch was and One is under the plastic piece above the steering wheel mount (just pull it, its clipped on.
15)Remove the vent. I used a tiny flat head screwdriver. The bottom end should pop out and you should be able to wiggle the rest out.
16)Now take the vent, remove the oem cover and angling fins inside. Do not forget the fins as I fiddled with this for about 20 minutes trying to figure out why it almost fit.
17)Cut a small hole in the side of the vent box somewhere so that you can pass the two wires through and connect to the new gauge which you should mount now and connect the wires.
18)Put the vent back in.
19)Take the shorter wire with the 4 open ends and open about 6 inches of the black covering exposing the 4 wires, it will make your life easier.
WIRING (this was the confusing part and why I started this thread as the solution for the blue was difficult to find and Eurojet released nothing for about a week)
20)Black is ground and can be wrapped around about any metal bolt in the area.
21)Red and White wires into a fuse slot in the top row of the fuse box. Use a spare fuse to hold the wires in place.
22)Orange wire splices it into the gray wire that goes into the #10 spot on the headlight switch harness. That is the SOLID Grey wire. The other Grey wire has a stripe and is not correct.
23)If you attemt to try out the gauge to test before buttoning everything up, It must have the dimmer plug connected and be at full level or the gauge will flash colors and not work.
24)It should be white till you flip the headlights on then it should turn Blue. If it does not check your wiring and plug connections and that dimmer switch.
25)Put your interior back together.
Personally do not like the brightness of this gauge at night as it is literally 2 or 3x brighter than stock. I believer there is a slight drain on the factory gauges dimming them a little. I am not satisfied as it is very distracting.
The Vent pod should have been angled towards the driver as it is a bit hard to read. If I can pick up an AWE vent I will switch this as I will live with the Brightness of the sun but the angle irritates me.
I did forget to take some pics along the way but i hope what I did snap will be helpful.
Attachments
-
 June 12 09 039.jpg470.8 KB · Views: 3,590
 -
 June 12 09 037.jpg401.8 KB · Views: 3,420
 -
 June 12 09 038.jpg360.4 KB · Views: 3,317
 -
 June 12 09 040.jpg392.5 KB · Views: 3,228
 -
 Mystery Hole.jpg31.6 KB · Views: 3,231
 -
 June 12 09 041.jpg476.9 KB · Views: 3,325
 -
 June 12 09 042.jpg425.8 KB · Views: 3,200
 -
 June 12 09 043.jpg246.5 KB · Views: 3,243
 -
 June 12 09 044.jpg397 KB · Views: 3,423