Here is a DIY on how to take apart the MKV Seats to install new seats covers or repair lumbar support and other parts to the seats.
I dont have pix of the first part of the disassemble but will post them later.
First thing is to remove the seats from the car by unscrewing the 4 bolts that hold the frame rails to the car frame and unconnect all Vag connection to the seat.
Once u have the seat out i recommend that u work on a padded or carpet area so u dont damage the seat.
Start by turning the seat on its back and disconnect all wire connections under the seat, like the lumbar support, heated seat pads, Airbag, and seats belt.
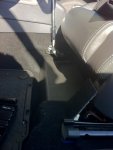
Next u need to turn the seats on its side with the roller knob facing up. U need to pry out the roller knob off with a trim tool and be very careful that u dont brake the clips on the back of the roller knob. If u do dont worry u can use super glue to fix it.
Now u nee to remove the height adjustment by pulling it up all the way so u can access the hole on the side of the handle to remove it. Look on the back of the handle while holding it up and use a flat head screw driver to push donw the metal clip and at the same time pull it straight out and it will come off. Its like pulling off the parking brake handle if u have ever done that before. The will be a metal clip left behind once the handle come off and u need to take this off as well.
Now that u have these parts off now u need to take off these black looking rivets that are right behind the roller knob and near the back of this side panel. I had to come behind the plastic rivet with a flat head and push it out from behind it. In the middle of the rivet u can push on it and it will make it pop out or u can use wire clippers and cut it out cause its plastic and it will fall off. Up to u im sure they are really cheap.
Now u can take off the whole side panel of the seat and u will need to make sure how u take it off and be very careful so u dont brake it. Pay attention on how u remove it cause its a bitch to put back on. U will need to take it off the metal roller knob frame and then work ur way down to the height handle and keep moving to the right away from the back of the seats. Once u get that panel off now u can take off the height adjustment if needed.
Next flip over the seat to its other side so u can access to the other side panel. Now u can remove the seat belt if needed. There is a few screws that is holding the panel on to the seat frame. Make sure u remove all parts on this side holding the panel on.
Now that u have all the plastic bits off the sides of the seat, now u can remove these 2 M6 bolts that are on both sides of the seat. These bolts are holding the top to the bottom and are torxed down to like 30ftlbs. These bolts are called M6 or 12 point 6mm bolts. Flip the seats on both sides to gain access to them, there are 4 total, 2 on both sides.
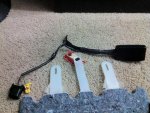
Once u remove these bolts the seat will fall apart and will be in 2 pieces. U will need to route the wire through the bottom seat to the top, wires go to lumbar, heat pad, and airbag.
Next if u need access to the Lumbar support, Airbag, or heat pads u will need to follow these steps.
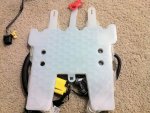
Flip the top part of the seat face down and look at the bottom of the seat. U will see where the seats covers come together and start at the right end and unsplit the seat covers. They come together by interlocking the like ziplock bags. Get ur fingers in there and pull apart and unsplit then all the way across.
Next u can do the same thing allong the back of the seat where the back pockets are on the back of the seat. These also splice together like the bottom of the seat. Now that u got it open there are 2 clips on both sides of the seat pocket flap, all u need to do with these clips is to put a trim tool under it and pull and slide it back away from the frame rail its clip to.
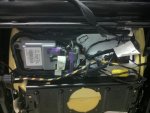
Now u can flip the back seat flap over to get access to the Lumbar support. There is a few padding in there but it can be removed by unclipping the to clips at the top of the flap. If u look into the seat u can see that the Lumbar motors are on both sides of the seat. I have not tried to see how it all works while having the seat wide open but i might do that tomorrow. Here is a pic of the motor, there is one on each side and have 2 wires going to them.
If anybody has any problems with there Lumbar Support and wants to fix it u can look at my pix and see what parts dont match up or are not working and broke. There are allot of parts when it comes to the Lumbar support in side of the seat, allot more than i thought there where going to be. I have not messed with or tried to replace one cause all mine work as of right now.
I dont have all the pix up yet in the first part of the DIY but i will get them up tomorrow.
I dont have pix of the first part of the disassemble but will post them later.
First thing is to remove the seats from the car by unscrewing the 4 bolts that hold the frame rails to the car frame and unconnect all Vag connection to the seat.
Once u have the seat out i recommend that u work on a padded or carpet area so u dont damage the seat.
Start by turning the seat on its back and disconnect all wire connections under the seat, like the lumbar support, heated seat pads, Airbag, and seats belt.
Next u need to turn the seats on its side with the roller knob facing up. U need to pry out the roller knob off with a trim tool and be very careful that u dont brake the clips on the back of the roller knob. If u do dont worry u can use super glue to fix it.
Now u nee to remove the height adjustment by pulling it up all the way so u can access the hole on the side of the handle to remove it. Look on the back of the handle while holding it up and use a flat head screw driver to push donw the metal clip and at the same time pull it straight out and it will come off. Its like pulling off the parking brake handle if u have ever done that before. The will be a metal clip left behind once the handle come off and u need to take this off as well.
Now that u have these parts off now u need to take off these black looking rivets that are right behind the roller knob and near the back of this side panel. I had to come behind the plastic rivet with a flat head and push it out from behind it. In the middle of the rivet u can push on it and it will make it pop out or u can use wire clippers and cut it out cause its plastic and it will fall off. Up to u im sure they are really cheap.
Now u can take off the whole side panel of the seat and u will need to make sure how u take it off and be very careful so u dont brake it. Pay attention on how u remove it cause its a bitch to put back on. U will need to take it off the metal roller knob frame and then work ur way down to the height handle and keep moving to the right away from the back of the seats. Once u get that panel off now u can take off the height adjustment if needed.
Next flip over the seat to its other side so u can access to the other side panel. Now u can remove the seat belt if needed. There is a few screws that is holding the panel on to the seat frame. Make sure u remove all parts on this side holding the panel on.
Now that u have all the plastic bits off the sides of the seat, now u can remove these 2 M6 bolts that are on both sides of the seat. These bolts are holding the top to the bottom and are torxed down to like 30ftlbs. These bolts are called M6 or 12 point 6mm bolts. Flip the seats on both sides to gain access to them, there are 4 total, 2 on both sides.
Once u remove these bolts the seat will fall apart and will be in 2 pieces. U will need to route the wire through the bottom seat to the top, wires go to lumbar, heat pad, and airbag.
Next if u need access to the Lumbar support, Airbag, or heat pads u will need to follow these steps.
Flip the top part of the seat face down and look at the bottom of the seat. U will see where the seats covers come together and start at the right end and unsplit the seat covers. They come together by interlocking the like ziplock bags. Get ur fingers in there and pull apart and unsplit then all the way across.
Next u can do the same thing allong the back of the seat where the back pockets are on the back of the seat. These also splice together like the bottom of the seat. Now that u got it open there are 2 clips on both sides of the seat pocket flap, all u need to do with these clips is to put a trim tool under it and pull and slide it back away from the frame rail its clip to.
Now u can flip the back seat flap over to get access to the Lumbar support. There is a few padding in there but it can be removed by unclipping the to clips at the top of the flap. If u look into the seat u can see that the Lumbar motors are on both sides of the seat. I have not tried to see how it all works while having the seat wide open but i might do that tomorrow. Here is a pic of the motor, there is one on each side and have 2 wires going to them.
If anybody has any problems with there Lumbar Support and wants to fix it u can look at my pix and see what parts dont match up or are not working and broke. There are allot of parts when it comes to the Lumbar support in side of the seat, allot more than i thought there where going to be. I have not messed with or tried to replace one cause all mine work as of right now.
I dont have all the pix up yet in the first part of the DIY but i will get them up tomorrow.
Last edited:
 :clap: