Trans Swap Begins
So my Dad told me I could use his beater car for the rest of the week and he will drive his car to work since the weather will be nice..
This gave me an idea..
Since he still needs to park his car in the garage. Ill just clean out the other side and stick my car there.. :thumbup:
So that's exactly what I did. Put all my parts in my dads parking spot too, so I had room to work.. Picture is a little blurry, but you get the point.
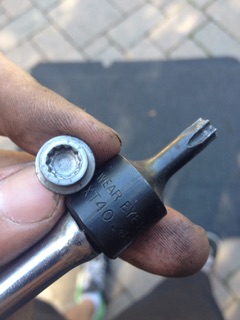
Anyway, First off I disconnected the battery which is in the trunk under the black plate:
Turns out the battery is submerged in water, and the bolts used to hold the cover on are triple square but I found that a T40 takes them off perfectly fine.
Anyway, disconnect the battery and close the trunk..
NOTE: Place something over lock to prevent it from locking.. it wont unlock with no batter connected.. I know from experience.
Now.. Remove your air box or COI, which ever you have to allow more room for work on top. The automatic trans has an external cooler which needs to be bypassed..
Follow the two hoses coming out of the cooler, one goes right up to a hose (6 inches away) the other goes to a metal pre bent tube that connects to the bottom coolant hoses.
Bottom coolant hose connects here:
Un-do the T piece by clamping the two hose that run straight trough. Undo the trans cooler hose and let the coolant run into a bucket. I bought a connector from Advance Auto to connect the two hoses. Once this is done you can unbolt a bracket on the side of the trans and finagle the metal tube out the bottom.
The top has the exact same set up. I just didn't take a picture of the t pipe or the cooler.. Once you put the connector in the two hoses, you can take out the cooler.. Three triple square bolts hold it on.. Don't remember the size. Should look like this with the lines bypassed and cooler out.
Next I took the drive side wheel well out, and took the axle's out of both sides. To get axle out you take the nut of the front, take off the bottom three ball joint bolts, take out the sway bar link bolt and the tyrod end. Probably don't need to take every one of those out but it just makes for a way easier job.
Sorry for blurry picture:
There are four hangers on the rear part of the exhaust. I popped the hangars off and took the bracket that goes across the rear part of tunnel, then lowered the rear of the exhaust down to the floor. Disconnected the drive shaft bolts in the front and rear, then took out the center support for the drive shaft.. Looks like a cover but, there is a bracket under it. From there the plan was to slide the drive shaft back and out the rear of the car.. Found out the part that bolts to transfer case would not fit in between the two down pipes.. So in order to get the bolts out of the down pipe the transfer case had to be unbolted to allow for different angles in order to get the bolts out. There are four bolts on the transfer case and a 6mm allen in the center of where the passenger axle bolts to.. This 6mm allen needs a special VW tool that I got for $14.
This picture you can see the top two transfer case bolts.
Once the transfer case bolts were out and was able to move slightly, the exhaust bolts were able to be removed. Three Nuts per down pipe.
Once they were out we noticed the O2 sensors were getting pulled.. So we traced the wires and there was a bracket the wires went to in the engine bay, next to the brake reservoir. We un clipped the plug on one side and couldn't get the plug on the O2 sensor side, so we just took the bracket off with two bolts.. Then fed the bracket and wires down to the pipes.. Pulled the pipes towards the back of the car along with drive shaft, then pulled the drive shaft out and put it to the side. Once that was done we layed the pipe on an upside down oil bucket so the bottom O2 sensors wouldn't have to be un plugged. We moved it as far to passenger side as it could and it wasn't in the way so we left it.
Next time for the shifter box to be installed.
In order to take the heat shield off that's in the tunnel you need to undo these "star" fasteners. (stole this picture off the internet by the way.. Didn't take a picture of mine)
They are the biggest pain to remove. They unscrew to come off but press on when you re install.
Once all are removed the heat shield will not come down because the two plastic covers on each side overlap the metal shield. there are plastic "bolts" that should just unscrew by hand when you have a socket on it. Loosen the ones closest to each side of the shield until the plastic part falls down allowing for the heat shield to come straight down revealing the bottom of the shift box.
Once the shield is removed make your way into the car and take out the two rear nuts that hold the automatic shift box in place.. Also remove the clip that is attached to the dsg shift box.
Clip is on the left above my finger.. Wire goes into the carpet.
There is a bracket above the front nuts that the center console bolts onto. Remove the nuts, then bracket then the shifter box nuts. Hold the shifter so it doesn't just hit the ground. Lower it and have someone grab it or just reach your arm through and place on the ground.
Next have someone put the manual shifter box up and tighten it down.
Now time for the trans removal

Put a jack under the oil pan of the engine and another under the trans.. You will need to raise/lower one or the other multiple times in order to get the trans out without removing the sub frame.
Can see the flywheel starting to poke through.
After some more time and wiggling..
Then we checked to make sure the flywheel would bolt up.. Using the old flywheel bolts we just put the manual one on to make sure.
Worked just fine..
Then we checked to make sure the transfer case bolted went on.
It did.
That was all the time we had for today. So we put the tools back, and made room for my dad's car.
Tomorrow the plan is to change brake pedal, install clutch pedal, install trans, put heat shield under car back on, connect drive shaft and exhaust, and go for test drive.. Hoping to be done tomorrow so I can get ecu flashed if it doesn't want to work. The computer aspect will be all trial and error.. As of right now its like doing a clutch change with a little extra work. :happyanim: