So with the rate of people modifying their cars to Stage II and beyond, and the direct result being the frequent death of the stock TSI clutch, it seems a lot of us are going to be replacing clutches sooner rather than later. I figured the MKV/VI gang could use a decent walk-through. This isn't it, lol! To create a bolt-by-bolt, tool-by-tool walk-through would add a serious amount of work to an already awful job.
If you're a beginner mechanic, this job isn't for you. Just take it to a good/great local VW shop or even the dealer. I'm not sure I'd trust this to a cheap generic transmission shop. There are too many "special" VW-type issues along the way.
Lets start with tools. Have a solid assortment of hand tools... metric sockets, extensions, drives, breakers, ratchets, XZNs (triple squares), 24mm 12pt (for the axle bolt), etc. I have a compressor. I don't use it much as I typically prefer hand tools, but a compressor and air tools are extremely helpful in this job. Transmission floor jack, you'll want one. It's not required, but if you're working alone, it's very helpful. I rock a Harbor Freight cheapo. It works. Engine support bar - this is the bomb. I bought one just for this job. It was on sale for $59 at Harbor Freight and it is invaluable. You need to pick up a couple of hooks for the engine lift points too... make sure they're rated for 1000 lbs or more, but they have to fit through your chain as well.
Again, this isn't intended to be a complete walk-through. This job can be dangerous and you need to be careful and a competent mechanic. I'm sure I'm missing a few small steps along the way, so you need to be able to apply some judgment and figure other stuff out.
Big steps:
- Disconnect GND from battery, positive from battery. Remove battery (13mm holddown clamp) and battery tray (3x 10mm screws).
- Remove your intake.
- Disconnect the shift cables. The one on the passenger side just uses a clip/washer. The one on the drivers side is odd. Twist the retaining ring, push the spring forward until it disengages the rod. See pic.
- Remove the cable mounting bracket from the transmission (3x 13mm screws).
- Disconnect the hydraulic line to the slave cylinder/throwout bearing. Remove spring clip and pull. It will leak a bit.
- Disconnect the starter electrical connections. One requires sliding a red tab back and then lifting the release gently. The big GND cable has a nut.
- Remove the upper starter/transmission bolt and two other upper transmission bolts (3x 18mm).
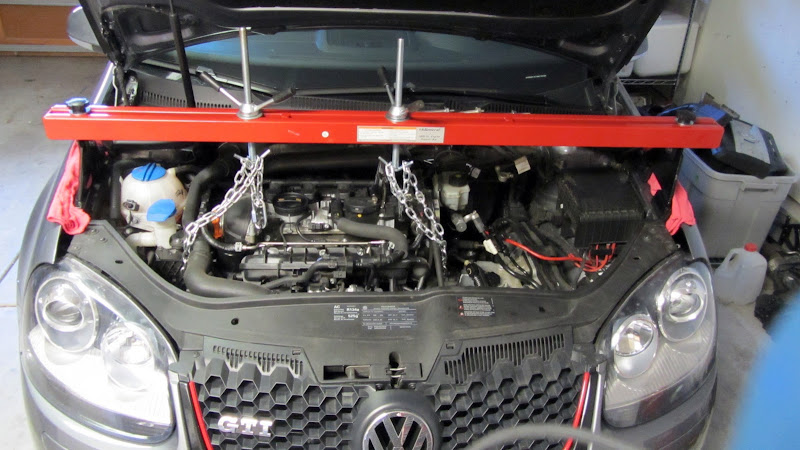
- Install your engine support bar. It's $59, just buy it! Be careful to keep it off of your fenders. You will destroy the paint on the fenders if this rocks into them.
- Loosen bolt front wheels. Jack the car as high as you reasonably can - be safe. Use chocks and jack stands.
- Remove wheels. Remove underbody tray and driver side wheel liner.
- Remove 13mm nut from starter. Move electrical crap as far foward as you can. This junk will be in your way if you don't do something with it. Remove the 18mm starter/transmission bolt. Don't drop the starter on your head.
- Disconnect the back-up switch connector from the transmission. It's near the starter on the trans case.
- Remove the two 10mm nuts that hold the level control sensor to the lower control arm. All MKV's have this. I assume only MKVI with HIDs will have this.
- Remove the drivers side axle nut - 12 pt 24mm. My impact wouldn't get it. It took the wife stepping on the brake and a big ass cheater bar on my 1/2" breaker. Be super careful not to press the clutch pedal if holding the brake!
- Remove the lower IC hose on the drivers side. Loose two T30 (?) torx on the TB pipe. I didn't bother removing it, but I just added some wiggle room.
- Remove the two 13mm downpipe support bolts from the crossmember.
- Remove the bolts holding both axles to the transmission output flanges. Qty 6, XZN10 on each axle. I indexed the axles to reach them all. You'll also need to hold the axles. A helper on the brake again works or a cheater bar against the floor off of axle nuts will hold it just fine.
- Remove nuts from lower control arm under the ball joint. (qty 3 16mm). Push the LCA down and remove the driver side axle. The passenger axle can stay put.
- Remove the pendulum arm assembly. (qty 2, 16mm, qty 1 21mm).
- Now here is where things get real, lol. You need to decide if you want to remove the subframe and driver side LCA. Some people claim this is unecessary. They say the transmission can slide out w/o dropping that stuff. Well, I tried and I say - don't waste your time or energy. Yeah, it will probably come out, but at what expense? You are beating the crap out of the clutch and flywheel in the process. So while it might be ok coming out, I wasn't willing to abuse my new clutch/flywheel in the same manner going back in. I dropped the subframe and drivers LCA and the transmission easily comes out. It's 14 more bolts, but they are all torque-to-yield (replace them!)... 4 hold the swaybar to the subframe (13mm), 4 hold the powersteering to the subframe (16mm), 4 hold the subframe to the frame (18mm), and two hold the LCA assembly to the frame (18mm). There's a 10mm bolt that has to come off the LCA assembly as well holding a power cable down.
- Ok, about to start lowering this monster. Check tension on the engine support bar. SLOWLY loosen and remove the three 18mm bolts from the driver side / transmission mount. The transmission will lower with them. You only want to drop it about 2.5". Use your engine support bar.
- Remove qty 3 bolts from that block of aluminum under the tranny mount. I forget the size, maybe 13mm or 16mm.
- Remove the black plastic shift lever. There's a lock washer and then it will slide out
- Move your transmission jack into place and support a little of the weight. Remove the remaining transmission bolts. I think there are four left. One is an XZN14. The others are 18mm.
- A little gentle prybar action and the transmission will start moving away from the engine.
- Navigating it out should be pretty easy with the subframe and LCA out of the way. Once you get enough room from the passenger axle, you can also remove the passenger side output flange from the differential. This little bugger will hang up on the back of the flywheel if you don't. It's a 6mm hex key. Be sure you're angling the flange upward because you're now breaking into the transmission fluid and it could spill. Here's another place for options.... you could choose to drain the MT fluid earlier into this job. You could also remove the drivers side flange. Some people say, that by removing both flanges you can avoid dropping the subframe and LCA! I can't promise this is true, but it certainly seems possible.
- You did it! Have a beer!
- Remove the pressure plate. These screws are a weird size. I think they are 9mm 12pts? I'm not sure because I didn't have the right socket. I used an English 12pt to get them off.
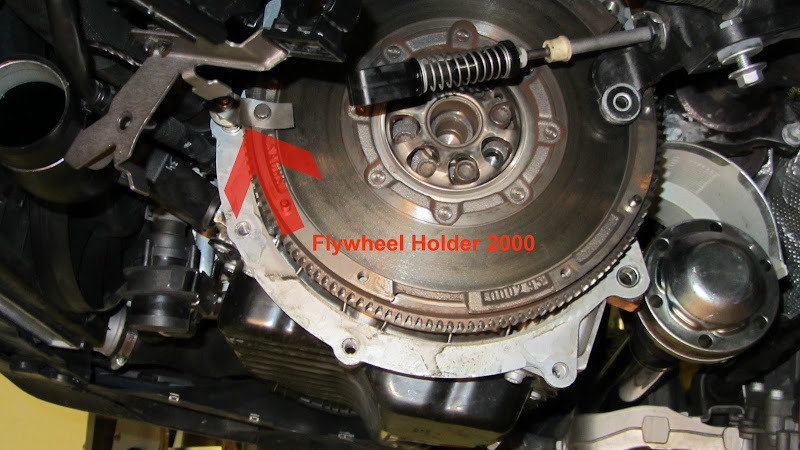
- Removing the flywheel bolts will take a little creativity as you need to keep the flywheel from rotating. On past clutch jobs, I've been able to shove something between the fw teeth and the casing. This fw sticks out too far for effective jamming of the ol' foreign object technique. I made little flywheel holder out of some steel banding I had laying around and a transmission bolt. It works. See pic.
- Putting the new flywheel on is fun. There is only one way the bolt holes line up... one. And it's not obvious. I was a little worried at first, lol. I had to break out the caliper to figure out what was going on. The torque for the new bolts is 60 NM + 90* rotation. This is tough! XZN's just aren't deep enough to support this kind of wrenching. I think the impact and marking them for 90* works well.
- Clean the new fw and pressure plate working surfaces with brake cleaner to spotless perfection! You don't want any grease on either surface.
- From here it's basically the reverse of disassembly. I'll update with torques, part numbers, and a few pics as I finish up. I just wanted to get this down on paper while it's fresh in my head. Good luck!
Last edited:
