nitroscope8
Ready to race!
- Location
- NY
As some of you know many a Rabbit don't have footwell lights installed from the factory. Why they deleted this I have no idea. Anyhoo...i'm doing this DIY as I work, so bear with me here! When you are done you will have fully FACTORY and functional footwell lights that turn on with doors open. They DO NOT turn on with the switch. That would NOT be factory ")
Parts:
VAG-COM needed...find someone who will lend you theirs or purchase your own!
Two footwell lights P/N 7L0 947 415
4 wire ends with short leads P/N 000 979 131 A (A just means gold plated, you don't need it to be)
1 wire P/N 000 979 025 A (again, A not needed)
2 wire connectors for each light 1J0 971 972
1 Circle grommet for ground wire (found at local auto store)
2 wire connectors (Pink from dealer)
1 lighter (heats the shrik part of the Pink connectors for waterproof connections
Wire strippers
wire crimpers
Large roll of 0,5mm3 (20-18 guage wire)
Small trim stick or screwdriver
T20 torx driver
This thread.
Here is a picture of all items needed:

More soon to follow!!!
I just found that the pin on the CECM needs a special wire and I had to order it. It should be here on thursday or friday. I'll keep ya posted.
Here are a few more pictures. We will be using Connector "B" on the cecm (central electrics module, located above the brake pedal) and Pin # 7 on the connector will house the new wire that we will be installing!

Remove the two T20 screws holding the cover on the driver side in.

Look up and you will see this image..this is your CECM!!! Read the picture and unlock the connectors by pushing that tab toward the driver side until it clicks.

Unlock the pin lock on the connector by prying at the bottom of the pink lock lever. This will let you push the new wire into the connector.

Some basic prefab work before going in the car. Wiring not done of course.
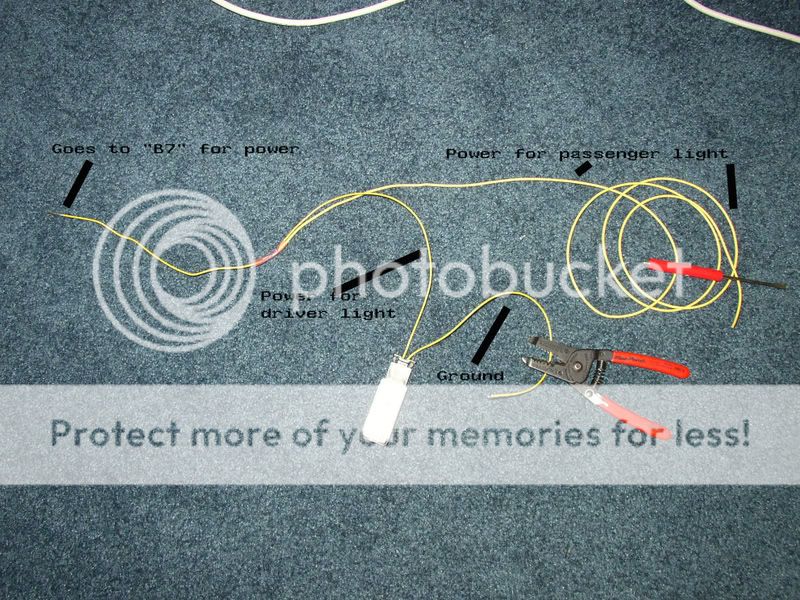
To maintain factory wiring diagrams, Pin 2 on the footwell light connector is power and pin 1 is ground...though it doesnt matter which way you have it.

So now what you do is take the prefab harness you just saw and lay it in the car. The grounds are going to be grounded into a screw holding hte dash in on either side of hte car where you will see a cap. The driver cap houses the fusebox and the passenger side houses an empty space. Make sure the ground wires are at least 12 inches long. You will be running each lite to its own ground source for a total of TWO grounds. Make sure the wire going from pin B7 is about a foot long or SLIGHTLY less. Splice a wire that is long enough to span the car and give power to the passenger side...look at the picture for details. The other wire in this splice goes into the driver footwell light.


the last two images are in a different post....
That that is the end of wiring up footwell lights designed to operate like factory! The bad part is you cannot have the wires in the same areas as the factory does it because the harness routes behind the whole dash and the grounds are welded connections. The best you can do is route the wires away from everything nad use zip ties to secure them out of the way.
The LAST and most important step is a Vag-Com. You need to go into 09 Central Electrics and click coding. Then go into long coding helper and view byte 0. Byte 0 shows up by default. The little checkbox that says "footwell lights installed" needs to be checked off and then you click "Do it!" Once you do that, remove all extra parts and VAG from the car. Shut all the doors and open them....you have working footwell lights! They come on when you take the key out of the ignition and they also come on when you open a door....just like factory.
Good luck!
Parts:
VAG-COM needed...find someone who will lend you theirs or purchase your own!
Two footwell lights P/N 7L0 947 415
4 wire ends with short leads P/N 000 979 131 A (A just means gold plated, you don't need it to be)
1 wire P/N 000 979 025 A (again, A not needed)
2 wire connectors for each light 1J0 971 972
1 Circle grommet for ground wire (found at local auto store)
2 wire connectors (Pink from dealer)
1 lighter (heats the shrik part of the Pink connectors for waterproof connections
Wire strippers
wire crimpers
Large roll of 0,5mm3 (20-18 guage wire)
Small trim stick or screwdriver
T20 torx driver
This thread.
Here is a picture of all items needed:
More soon to follow!!!
I just found that the pin on the CECM needs a special wire and I had to order it. It should be here on thursday or friday. I'll keep ya posted.
Here are a few more pictures. We will be using Connector "B" on the cecm (central electrics module, located above the brake pedal) and Pin # 7 on the connector will house the new wire that we will be installing!
Remove the two T20 screws holding the cover on the driver side in.
Look up and you will see this image..this is your CECM!!! Read the picture and unlock the connectors by pushing that tab toward the driver side until it clicks.
Unlock the pin lock on the connector by prying at the bottom of the pink lock lever. This will let you push the new wire into the connector.
Some basic prefab work before going in the car. Wiring not done of course.
To maintain factory wiring diagrams, Pin 2 on the footwell light connector is power and pin 1 is ground...though it doesnt matter which way you have it.
So now what you do is take the prefab harness you just saw and lay it in the car. The grounds are going to be grounded into a screw holding hte dash in on either side of hte car where you will see a cap. The driver cap houses the fusebox and the passenger side houses an empty space. Make sure the ground wires are at least 12 inches long. You will be running each lite to its own ground source for a total of TWO grounds. Make sure the wire going from pin B7 is about a foot long or SLIGHTLY less. Splice a wire that is long enough to span the car and give power to the passenger side...look at the picture for details. The other wire in this splice goes into the driver footwell light.
the last two images are in a different post....
That that is the end of wiring up footwell lights designed to operate like factory! The bad part is you cannot have the wires in the same areas as the factory does it because the harness routes behind the whole dash and the grounds are welded connections. The best you can do is route the wires away from everything nad use zip ties to secure them out of the way.
The LAST and most important step is a Vag-Com. You need to go into 09 Central Electrics and click coding. Then go into long coding helper and view byte 0. Byte 0 shows up by default. The little checkbox that says "footwell lights installed" needs to be checked off and then you click "Do it!" Once you do that, remove all extra parts and VAG from the car. Shut all the doors and open them....you have working footwell lights! They come on when you take the key out of the ignition and they also come on when you open a door....just like factory.
Good luck!

