semaj8james
New member
- Location
- Canada
Hello delicious members of GolfMKV! After spending a solid week, and over 36 hours on this, I figured I might as well help some members looking to do a custom speaker install in their dub!
What you need:
Flat head screwdriver(s) (the best multitool)
Subwoofer
Amplifier to match
Wire rated to higher than your max output (good wire in general)
LOC (optional)
RCA cables (or speaker wire if not running LOC)
Fuse
Ground wire
Wire stripper
Ring loops
Power drill
Drill bits
Sheet metal screws
Electrical tape
Wire taps
Adhesives and whatnot
Common sense
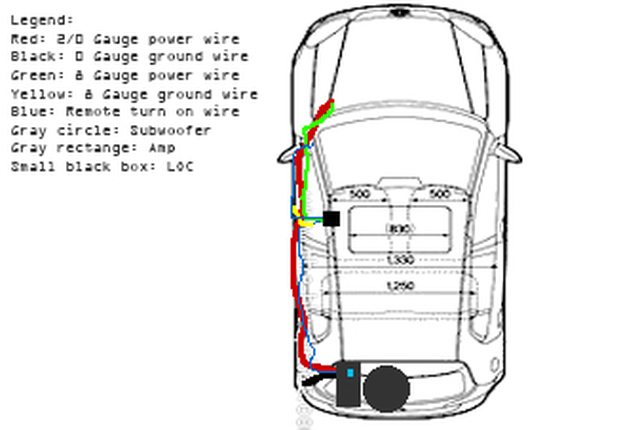
Begin by sketching a small schematic and properly understanding the task you're going to do. An example of this is one that I drew up
Begin by rounding up your materials and stuff. Zero of what I bought in parts was new, as I pulled the 2/0 AWG wire from an old 335i at the Pick 'n pull, same with the 0 gauge and the 8 gauge was laying around.
Begin by removing some panels from your car. Specially needed are: driver side floor kick panel, left rear passenger side floor kick panel, fuse box panel (left side of dashboard), hood latch panel. Once those are removed, the rest can be done relatively easily. Note, panels pop out realtively easily, but require some muscle, so don't be afraid to use force!
Now, to the left of the clutch pedal is a grommet used by a bundle of wires already. Put a coathanger through the ring end of your wire, feed it through, and pull it through. It is a PITA to do it, and you'll likely need to cut a slot in the grommet to make it easier. Don't worry though, it will go through eventually. In order to pull it through, you'll likely want to remove your battery and the battery holder. Do so.
To recap: Remove floor kick panels, remove battery & holder, feed amp power wire and LOC power wire (if using LOC) through firewall using grommet to the left of clutch pedal.
LOC and amp power wire from battery

LOC and amp power wire going under the firewall, through the grommet.

Now, remove the back seat cushions (don't need to remove back seats) with the tutorial here: http://www.golfmkv.com/forums/showthread.php?p=902339
Run your amp power wire all the way through from front to back, beside the existing wire bundle that is under the panel hooks. Run it where the seat bench used to be, leave it in the 'trunk', and leave it for now.
______________________________________________________________________________________________________________________________
[LOC]
These steps all depend on the type of LOC you use; if any at all. I use the Audiocontrol LC2I and the guide will be for it.
Place your LOC under the driver seat for easy access to the bass controls.
Run your LOC power wire until you come to the driver seat. Now, run that LOC power wire UNDER the carpet, and have it pop out of the little flap under the driver seat, to the LOC. Grab your ground wire for your LOC, and run it from the LOC, under the carpet, and then bring it back over. Find a suitable place to ground it, preferably drilling a small hole in the metal, and shaving away the paint to make sure it has good connection. Now, remember that bundle of wires that you've seen quite a few times already? You're going to need to cut two wires and splice them. The ones you need are STRIPED BROWN AND STRIPED RED. This goes to your REAR DOOR SPEAKER. Splice the striped brown and striped red wire so it has a branch off to go to your LOC - this is needed to send a signal to your subwoofer via RCA cables! Unfortunately I don't have great pictures of this process, but I have faith you can figure it out relatively well.
LOC, with wires running under carpet to it

Remember your remote wire, right? Ok, so now take off your side dash panel to reveal your fuse box. Take out the cigarette lighter fuse (should be a 20V fuse), and wrap the bare end of the wire around it, and replace the fuse. Don't worry, you will not have any issues with the lighter and or the remote wire.


LOC with wires. +L is red and white, -L is brown and white, +-R is not needed, lower blue wire is remote wire in from fuse box, upper blue wire is remote wire to the amp, two lower red wires are the power and ground wires respectively. The right side only has the RCA cables running to the amp. The LOC should power on to have a red light when it works properly!

Run that remote wire from the under the kick panels, to under that carpet I talked about earlier, and finally to your LOC. Run the remote OUT wire from the LOC, back under the carpet, all the way to your amp. The last step is running your RCA cables from the LOC, under the carpet again, all the way to your amp.

______________________________________________________________________________________________________________________________

Now that we have amp power wire, RCA cables and remote wire ready to plug into the amp, we now have to concern over the ground wire. Remove the trunk floor cover and the styrofoam cover thing. Find a place to make your ground, sand away the paint, and drill a hole, and firmly ground your ground wire. Make sure it's tight and will not come off.

I then put a hole through the styrofoam and the trunk floor cover in order to cleanly run the ground to my amp.

Voila. Clean setup!

What you need:
Flat head screwdriver(s) (the best multitool)
Subwoofer
Amplifier to match
Wire rated to higher than your max output (good wire in general)
LOC (optional)
RCA cables (or speaker wire if not running LOC)
Fuse
Ground wire
Wire stripper
Ring loops
Power drill
Drill bits
Sheet metal screws
Electrical tape
Wire taps
Adhesives and whatnot
Common sense
Begin by sketching a small schematic and properly understanding the task you're going to do. An example of this is one that I drew up
Begin by rounding up your materials and stuff. Zero of what I bought in parts was new, as I pulled the 2/0 AWG wire from an old 335i at the Pick 'n pull, same with the 0 gauge and the 8 gauge was laying around.
Begin by removing some panels from your car. Specially needed are: driver side floor kick panel, left rear passenger side floor kick panel, fuse box panel (left side of dashboard), hood latch panel. Once those are removed, the rest can be done relatively easily. Note, panels pop out realtively easily, but require some muscle, so don't be afraid to use force!
Now, to the left of the clutch pedal is a grommet used by a bundle of wires already. Put a coathanger through the ring end of your wire, feed it through, and pull it through. It is a PITA to do it, and you'll likely need to cut a slot in the grommet to make it easier. Don't worry though, it will go through eventually. In order to pull it through, you'll likely want to remove your battery and the battery holder. Do so.
To recap: Remove floor kick panels, remove battery & holder, feed amp power wire and LOC power wire (if using LOC) through firewall using grommet to the left of clutch pedal.
LOC and amp power wire from battery
LOC and amp power wire going under the firewall, through the grommet.
Now, remove the back seat cushions (don't need to remove back seats) with the tutorial here: http://www.golfmkv.com/forums/showthread.php?p=902339
Run your amp power wire all the way through from front to back, beside the existing wire bundle that is under the panel hooks. Run it where the seat bench used to be, leave it in the 'trunk', and leave it for now.
______________________________________________________________________________________________________________________________
[LOC]
These steps all depend on the type of LOC you use; if any at all. I use the Audiocontrol LC2I and the guide will be for it.
Place your LOC under the driver seat for easy access to the bass controls.
Run your LOC power wire until you come to the driver seat. Now, run that LOC power wire UNDER the carpet, and have it pop out of the little flap under the driver seat, to the LOC. Grab your ground wire for your LOC, and run it from the LOC, under the carpet, and then bring it back over. Find a suitable place to ground it, preferably drilling a small hole in the metal, and shaving away the paint to make sure it has good connection. Now, remember that bundle of wires that you've seen quite a few times already? You're going to need to cut two wires and splice them. The ones you need are STRIPED BROWN AND STRIPED RED. This goes to your REAR DOOR SPEAKER. Splice the striped brown and striped red wire so it has a branch off to go to your LOC - this is needed to send a signal to your subwoofer via RCA cables! Unfortunately I don't have great pictures of this process, but I have faith you can figure it out relatively well.
LOC, with wires running under carpet to it
Remember your remote wire, right? Ok, so now take off your side dash panel to reveal your fuse box. Take out the cigarette lighter fuse (should be a 20V fuse), and wrap the bare end of the wire around it, and replace the fuse. Don't worry, you will not have any issues with the lighter and or the remote wire.
LOC with wires. +L is red and white, -L is brown and white, +-R is not needed, lower blue wire is remote wire in from fuse box, upper blue wire is remote wire to the amp, two lower red wires are the power and ground wires respectively. The right side only has the RCA cables running to the amp. The LOC should power on to have a red light when it works properly!
Run that remote wire from the under the kick panels, to under that carpet I talked about earlier, and finally to your LOC. Run the remote OUT wire from the LOC, back under the carpet, all the way to your amp. The last step is running your RCA cables from the LOC, under the carpet again, all the way to your amp.
______________________________________________________________________________________________________________________________
Now that we have amp power wire, RCA cables and remote wire ready to plug into the amp, we now have to concern over the ground wire. Remove the trunk floor cover and the styrofoam cover thing. Find a place to make your ground, sand away the paint, and drill a hole, and firmly ground your ground wire. Make sure it's tight and will not come off.
I then put a hole through the styrofoam and the trunk floor cover in order to cleanly run the ground to my amp.
Voila. Clean setup!
Last edited: