Swiper
Go Kart Champion
- Location
- Milwaukee, WI
- Car(s)
- 2009 VW GLI
***FAIR WARNING! Cellphone pic intensive due to me not having a legit camera. However there are some nice shots here every once in a while***
So figured I'd post a build thread finally. I used to have a 2009 United Grey GTI, was on Koni coils and was Stage 2 and R32 rear end, but I got really sick of two doors and wanted a 4 door GTI, but my buddy was selling his GLI..... so I settled for that. Car is a 2009 Jetta GLI with 2.0T (TSI) APR tuned, APR Ko4 turbo, APR intercooler, APR rear sway, APR Carbonio intake, Raceland downpipe to Magnaflow catback. (I don't have any photo's of the install for this stuff because I bought the car from my friend with all of this :happyanim")
So I started with ST Coils and the car looked like this.

Then I hated the plastic paddles, so i bought these from S2T Performance

Then ran into a small delay with the downpipe haha, Luckily my buddy hooked it up with some solid welding


Then this happened....

So started with these materials....
-New version of Airlift Performance front struts/bags. Camber plates up top. I believe I have 2 and 5/16" of threads.
-Airlift double bellow rears
-Bilstein Sports rear Struts
-Accuair E-level and Vu4 version 3.0
-AZ OB2 comp.
-Accuair skinny 5 gal.
-3/8 SMC Water trap (mounted before the manifold)


First thing first was getting the trunk set up the way I wanted it. This is my daily so I can't afford to leave it on jack stands all day. Anyways, pics


So I started with 1/2" MDF and used the old trunk carpet as a template, then made a small cardboard template to make the small indentation to the left (for the compressor to sit) after that I screwed 1" strips of wood underneath so I can run wires/ lines/ etc. the split down the left half of the trunk is so I can access my spare tire by taking out the right side, it is also because that is where my seat splits and I still have the ability to put long packages and such in the trunk/thru seats. You'll see. Wrapped it in the sub box fabric that I got from best buy, it is a really close match and looks good. Used some 3M fabric glue adhesive spray can stuff I got from Walmart. Worked well, had to use a thick coat on the MDF and fabric since they are porous materials, let it tack up a bit, then stick together. Wrapped it around the edged and glued the edges and around the back side and wrapped the fabric a few inches on the other side and cut the excess.
As you can see I mounted everything along the left side, as stated before I didn't want to lose my thru seats storage. Also I like the way it looks. I was worried about weight distribution, but after driving it I don't even notice the extra weight on the left side.
I forgot to take many pictures after this, but I had the Accuair power kit, I mounted the fuse directly onto the battery box, then routed the wire thru the firewall through a grommet behind the brake pedal. Then ran all the wires (purple for the controller dimming, black controller wire, and orange ignition wire) all through the kick panels along the drivers side. The ignition wire (orange) was routed to the #42 fuse of the panel on the outside of the drivers dash (the one you open the door to get to) using an add a circuit, from checkers. The purple was routed into the cigarette lighter. Pull up the shifter and get to the screws for the coin tray, remove coin tray and cut the gray wire to the cigarette lighter, this is the wire for the light ring around it, just splice it in there and put everything back together. Drilled a hole in the coin tray to route the wire to the e-level controller. I believe that covers wiring. Oh, I grounded everything to grounds I found inside the trunk along the left side (remove the carpet to get to them)
If you guys want more pics let me know and I will try to get some, not sure how good of a job explaining I am doing. I'm hoping to help future mkv guys bagging in their home garage.
Used the Exo mount and turned it so the manifold is on the top of the tank and not the side.

Love the raw tank and the exposed lines and wiring. Everything will be cleaned up with some braided wire covers from Jegs and thinking about using copper lines eventually. I tried to build things as simple as possible to have it as trouble free as possible. Still a work in progress and will update as more things come to mind. Hit me up on here if you want clarification on anything!
I didn't take any pics during the suspension install because airlifts directions for the installs are pretty straight forward. The rear bag directions are on point. The fronts could use some updates (pics and stuff). Anyways....
Touchdown... Photo's by my friend Joshua Semenko (IG account is @deuce_coupe)

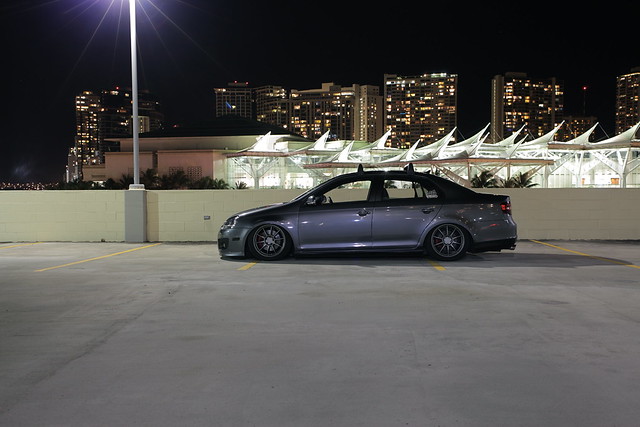

Shout outs to my awesome friends that pulled long shifts in my garage. Justin and Jesse from Team Foreign Objects, Cris from Ungluck Inc., the rest of my TFO family for support and info, and my awesome girlfriend that supports my big purchases haha. If I forgot anyone I'm sorry, so thankful for the help I received and doing stuff with you and your friends in the garage is super fun (not to mention saving mad $€£¥)
-Swiper
So figured I'd post a build thread finally. I used to have a 2009 United Grey GTI, was on Koni coils and was Stage 2 and R32 rear end, but I got really sick of two doors and wanted a 4 door GTI, but my buddy was selling his GLI..... so I settled for that. Car is a 2009 Jetta GLI with 2.0T (TSI) APR tuned, APR Ko4 turbo, APR intercooler, APR rear sway, APR Carbonio intake, Raceland downpipe to Magnaflow catback. (I don't have any photo's of the install for this stuff because I bought the car from my friend with all of this :happyanim
So I started with ST Coils and the car looked like this.
Then I hated the plastic paddles, so i bought these from S2T Performance
Then ran into a small delay with the downpipe haha, Luckily my buddy hooked it up with some solid welding
Then this happened....
So started with these materials....
-New version of Airlift Performance front struts/bags. Camber plates up top. I believe I have 2 and 5/16" of threads.
-Airlift double bellow rears
-Bilstein Sports rear Struts
-Accuair E-level and Vu4 version 3.0
-AZ OB2 comp.
-Accuair skinny 5 gal.
-3/8 SMC Water trap (mounted before the manifold)
First thing first was getting the trunk set up the way I wanted it. This is my daily so I can't afford to leave it on jack stands all day. Anyways, pics
So I started with 1/2" MDF and used the old trunk carpet as a template, then made a small cardboard template to make the small indentation to the left (for the compressor to sit) after that I screwed 1" strips of wood underneath so I can run wires/ lines/ etc. the split down the left half of the trunk is so I can access my spare tire by taking out the right side, it is also because that is where my seat splits and I still have the ability to put long packages and such in the trunk/thru seats. You'll see. Wrapped it in the sub box fabric that I got from best buy, it is a really close match and looks good. Used some 3M fabric glue adhesive spray can stuff I got from Walmart. Worked well, had to use a thick coat on the MDF and fabric since they are porous materials, let it tack up a bit, then stick together. Wrapped it around the edged and glued the edges and around the back side and wrapped the fabric a few inches on the other side and cut the excess.
As you can see I mounted everything along the left side, as stated before I didn't want to lose my thru seats storage. Also I like the way it looks. I was worried about weight distribution, but after driving it I don't even notice the extra weight on the left side.
I forgot to take many pictures after this, but I had the Accuair power kit, I mounted the fuse directly onto the battery box, then routed the wire thru the firewall through a grommet behind the brake pedal. Then ran all the wires (purple for the controller dimming, black controller wire, and orange ignition wire) all through the kick panels along the drivers side. The ignition wire (orange) was routed to the #42 fuse of the panel on the outside of the drivers dash (the one you open the door to get to) using an add a circuit, from checkers. The purple was routed into the cigarette lighter. Pull up the shifter and get to the screws for the coin tray, remove coin tray and cut the gray wire to the cigarette lighter, this is the wire for the light ring around it, just splice it in there and put everything back together. Drilled a hole in the coin tray to route the wire to the e-level controller. I believe that covers wiring. Oh, I grounded everything to grounds I found inside the trunk along the left side (remove the carpet to get to them)
If you guys want more pics let me know and I will try to get some, not sure how good of a job explaining I am doing. I'm hoping to help future mkv guys bagging in their home garage.
Used the Exo mount and turned it so the manifold is on the top of the tank and not the side.
Love the raw tank and the exposed lines and wiring. Everything will be cleaned up with some braided wire covers from Jegs and thinking about using copper lines eventually. I tried to build things as simple as possible to have it as trouble free as possible. Still a work in progress and will update as more things come to mind. Hit me up on here if you want clarification on anything!
I didn't take any pics during the suspension install because airlifts directions for the installs are pretty straight forward. The rear bag directions are on point. The fronts could use some updates (pics and stuff). Anyways....
Touchdown... Photo's by my friend Joshua Semenko (IG account is @deuce_coupe)
Shout outs to my awesome friends that pulled long shifts in my garage. Justin and Jesse from Team Foreign Objects, Cris from Ungluck Inc., the rest of my TFO family for support and info, and my awesome girlfriend that supports my big purchases haha. If I forgot anyone I'm sorry, so thankful for the help I received and doing stuff with you and your friends in the garage is super fun (not to mention saving mad $€£¥)
-Swiper
Last edited:


