gtiboy87
GTI ON CRACK!!
- Location
- Pennsylvania
- Car(s)
- 2007 mkv gti
I know there is a DIY for this on vwvortex, however i added a few helpful things.
First off a little history on my mkv gti. I am running stg3 kit from APR this will include the APR HPFP (this is the main part i am working with as the same with you all) The motor has about 5000 miles on it. The car itself has 55k on it. I have not yet checked the cam follower and i am at 55k on the car. I am going to assume that this is the case with most of us on this forum. This is do to the fact that a lot of guys are just now having a lot of costly problems with this HIGHLY engineered VW part :thumbsup:
I will show pics STEP BY STEP on how to check the cam follower. I will also show pics on tools you will need to make this job as easy as possible.
1. To avoid any fuel leaking all over your engine bay it is best to release the pressure valve (using towels under the fuel pump to catch the leaking fuel) and then let the car sit for awhile. Allowing the car to sit for awhile, (example i let mine sit overnight because i had to go do something else) prevented fuel from flowing out of the metal line that you will have to undo off the fuel pump. You do NOT have to wait this long. I found it to work for me. I followed the DIY on vwvortex, )had the car out driving for a few minutes because i have not been driving it all) and when i took the metal line off the bottom of the fuel pump fuel went EVERYWHERE even after i released the pressure through the pressure release valve. Its up to you :iono:
All of this will be explained later on with pictures. NOW THE FUN BEGINS :happyanim:
Tools needed:

1. A screwdriver with a flat shaped top to use on the shrader valve (pressure release valve) You will be pushing on the end of the pressure valve tip to release the pressure (keep towels under fuel pump)
2. Small flat head (i used this to take off the bottom sensor connector on the fuel pump, dont know why they didnt just have the sensor facing up for easy disconnect)
3. 17mm wrench (used to take off metal line under fuel pump)
4. Ratchet with a 13mm deep well to take off the pressure relief valve after releasing pressure
5. Stubby flat head (i used this to move my intake out of the way)
6. Ratchet with extension
7. Set of torx bits ( you will only be needing a t30 torx bit)
The motor very shiny and pretty VERY NICE HOW MUCH!!!!! :thumbsup:

You will be working in this area :wink:

The steps are as follows:
1. Move intake out of the way for better working area

2. Move this line out of the way also (next to the fuel pump, it SIMPLY pulls off, no nothing will spill out i PROMISE:thumbsup


3. Release the pressure by using your flat head screwdriver THINGY MAGIGGY! Keep towels under the fuel pump and release the pressure slowly so that fuel doesNOT hit you in the eye:thumbsup: Its my one million dollar tool

4. After releasing the pressure from the valve REMOVE IT! Using your small ratchet and 13mm deep well socket. Mine was on their pretty tight. If it feels very tight, dont freak out just slowly apply pressure. DO NOT USE A 13mm wrench on this part. You WILL start to bend it!!:happyanim:
5. Take off the top sensor to the fuel pump using your small flat head screwdriver to push the clip up releasing it from the connector

6. Take off the bottom sensor again using your small flat head screwdriver. Its a bit tight in that spot, but slowly pull the tab in and out do NOT break this clip on the sensor DAMMIT!addle:


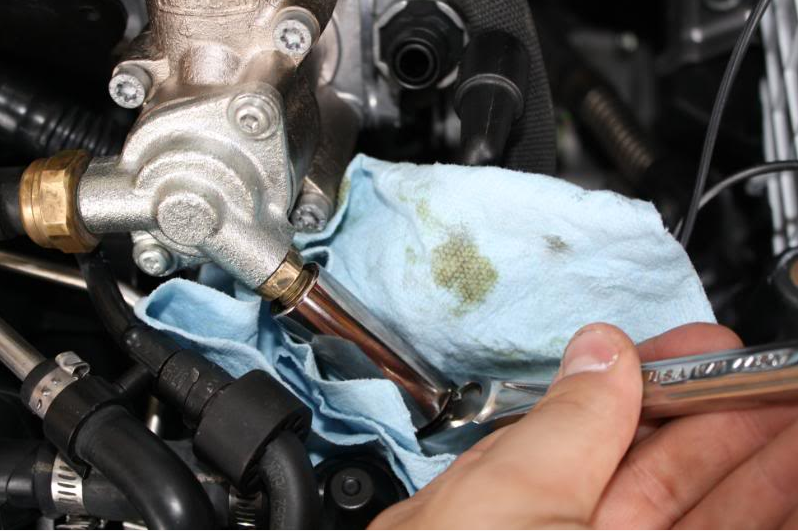
7. Ok now you will have to loosen the bottom nut that has the metal line going to it. This line has a ball shape at the end of it going into the fuel pump. USE your 17mm wrench to first loosen the top brass nut some, once that is slightly loose then you can loosen the bottom (silver) nut that has the metal line goint to it.

Loosen top first just enough to where its broken loose from being tight do NOT take it off completely this is not needed. If you do it will be a pain in the ASS to get back on without having to take off the OTHER RUBBER LINE (JUST IGNORE THIS LINE, DO NOT MESS WITH IT)

Now loosen and take off the bottom (Silver) nut that goes to the metal line. You can loosen this nut until it falls off and slides down the metal line that will be just FINE:thumbsup:

8. Now using your T30 torx bit, u can loosen the 3 torx bit bolts holding down the fuel pump. HINT!!!! HINT!!! Loosen each bolt a turn at a time. The pump has a spring on the end of it. There is pressure that will start to push the pump out towards you. If you loosen one bolt at a time you could possibly mess up the threads to the torx bolts when unbolting. Loosen these bolts in a cross pattern and try to hold onto the pump as well :thumbup:


9. Once you have the torx bolts out and the fuel pump no longer bolted. You will have to wiggle the pump to the side when pulling it out. Do to 2 line running to the bottom of the fuel pump (rubber hose) it will hold the fuel pump down some, just wiggle it up and over to move it out of the way to get to the cam follower piece.

10. Once the pump is out of the way you can no simply grab the cam follower as it sits right inside the hole that the fuel pump sring slides into (the area where you pulled the pump out) IF YOU FORGET!! How the cam follower goes back in (some guys are new at this stuff i tried to make this as easy (step by step as possible) Look at the cam follower you have the flat surface that the camshaft lobe will hit and ride on and then you have the open end where the spring with the flat tip at the end of it, will slide into. The spring with the flat tip on the end will push up against the inside of the cam follower if you look in the inside of the cam follower you will see a white gray spot.... put the cam follower back into the hole with flat area going IN against the camshaft:thumbsup:

11. Pull the cam follower out and inspect ALONG with looking at your camshaft as well


Pics of inside where the cam follower goes.
That would be the camshaft area that the cam follower rides along. The blue object is a small flashlight


Simply follow these steps backwards to reassemble!!!! MAKE SURE YOU PUT FRESH OIL BACK ON THE CAM FOLLOWER BEFORE INSTALLING IT BACK INTO THE MOTOR. If you do not do this, this could hurt the follower and camshaft do to the fact that you have two metal dry objects riding along each other. AND of course your motor always likes fresh oil. :thumbsup: ALSO the torque for the torx bits that hold the fuel pump in place is about 7 1/2 ft lbs DO NOT TORQUE THIS HEAVY!!! When installing the (silver) nut back onto the fuel pump thread it on, then tighten the top (Brass nut) somewhat tight, i think you all know how much is too tight dont crank the thing!! Same goes for the bottom (silver) nut and for the Pressure Reliefe valve. ANOTHER VERY VERY IMPORTANT STEP Make sure you prime your fuel pump after you have re-installed it onto your car. What you want to do is turn your ignition key just to where your inside lights come on etc.... DO NOT start the car. You will do this process 5 times @ each time wait 10 seconds then turn key to off position. STEPS:
1. Turn key to on position DO NOT start engine, wait 10 seconds, turn key to off position
2. Turn key to on position DO NOT start engine, wait 10 seconds, turn key to off position
Complete this process 5 times in a row BEFORE starting your engine. Once engine is started LISTEN for vaccum leaks (the hose i told you to take off next to the fuel pump location) LOOK around your fuel pump make sure you have no leakes. Let car idle for a minute or two
Questions IM ME:happyanim:
First off a little history on my mkv gti. I am running stg3 kit from APR this will include the APR HPFP (this is the main part i am working with as the same with you all) The motor has about 5000 miles on it. The car itself has 55k on it. I have not yet checked the cam follower and i am at 55k on the car. I am going to assume that this is the case with most of us on this forum. This is do to the fact that a lot of guys are just now having a lot of costly problems with this HIGHLY engineered VW part :thumbsup:
I will show pics STEP BY STEP on how to check the cam follower. I will also show pics on tools you will need to make this job as easy as possible.
1. To avoid any fuel leaking all over your engine bay it is best to release the pressure valve (using towels under the fuel pump to catch the leaking fuel) and then let the car sit for awhile. Allowing the car to sit for awhile, (example i let mine sit overnight because i had to go do something else) prevented fuel from flowing out of the metal line that you will have to undo off the fuel pump. You do NOT have to wait this long. I found it to work for me. I followed the DIY on vwvortex, )had the car out driving for a few minutes because i have not been driving it all) and when i took the metal line off the bottom of the fuel pump fuel went EVERYWHERE
even after i released the pressure through the pressure release valve. Its up to you :iono:All of this will be explained later on with pictures. NOW THE FUN BEGINS :happyanim:
Tools needed:
1. A screwdriver with a flat shaped top to use on the shrader valve (pressure release valve) You will be pushing on the end of the pressure valve tip to release the pressure (keep towels under fuel pump)
2. Small flat head (i used this to take off the bottom sensor connector on the fuel pump, dont know why they didnt just have the sensor facing up for easy disconnect)
3. 17mm wrench (used to take off metal line under fuel pump)
4. Ratchet with a 13mm deep well to take off the pressure relief valve after releasing pressure
5. Stubby flat head (i used this to move my intake out of the way)
6. Ratchet with extension
7. Set of torx bits ( you will only be needing a t30 torx bit)
The motor very shiny and pretty VERY NICE HOW MUCH!!!!! :thumbsup:
You will be working in this area :wink:
The steps are as follows:
1. Move intake out of the way for better working area
2. Move this line out of the way also (next to the fuel pump, it SIMPLY pulls off, no nothing will spill out i PROMISE:thumbsup
3. Release the pressure by using your flat head screwdriver THINGY MAGIGGY! Keep towels under the fuel pump and release the pressure slowly so that fuel doesNOT hit you in the eye:thumbsup: Its my one million dollar tool
4. After releasing the pressure from the valve REMOVE IT! Using your small ratchet and 13mm deep well socket. Mine was on their pretty tight. If it feels very tight, dont freak out just slowly apply pressure. DO NOT USE A 13mm wrench on this part. You WILL start to bend it!!:happyanim:
5. Take off the top sensor to the fuel pump using your small flat head screwdriver to push the clip up releasing it from the connector
6. Take off the bottom sensor again using your small flat head screwdriver. Its a bit tight in that spot, but slowly pull the tab in and out do NOT break this clip on the sensor DAMMIT!
addle:
7. Ok now you will have to loosen the bottom nut that has the metal line going to it. This line has a ball shape at the end of it going into the fuel pump. USE your 17mm wrench to first loosen the top brass nut some, once that is slightly loose then you can loosen the bottom (silver) nut that has the metal line goint to it.
Loosen top first just enough to where its broken loose from being tight do NOT take it off completely this is not needed. If you do it will be a pain in the ASS to get back on without having to take off the OTHER RUBBER LINE (JUST IGNORE THIS LINE, DO NOT MESS WITH IT)
Now loosen and take off the bottom (Silver) nut that goes to the metal line. You can loosen this nut until it falls off and slides down the metal line that will be just FINE:thumbsup:
8. Now using your T30 torx bit, u can loosen the 3 torx bit bolts holding down the fuel pump. HINT!!!! HINT!!! Loosen each bolt a turn at a time. The pump has a spring on the end of it. There is pressure that will start to push the pump out towards you. If you loosen one bolt at a time you could possibly mess up the threads to the torx bolts when unbolting. Loosen these bolts in a cross pattern and try to hold onto the pump as well :thumbup:
9. Once you have the torx bolts out and the fuel pump no longer bolted. You will have to wiggle the pump to the side when pulling it out. Do to 2 line running to the bottom of the fuel pump (rubber hose) it will hold the fuel pump down some, just wiggle it up and over to move it out of the way to get to the cam follower piece.
10. Once the pump is out of the way you can no simply grab the cam follower as it sits right inside the hole that the fuel pump sring slides into (the area where you pulled the pump out) IF YOU FORGET!! How the cam follower goes back in (some guys are new at this stuff i tried to make this as easy (step by step as possible) Look at the cam follower you have the flat surface that the camshaft lobe will hit and ride on and then you have the open end where the spring with the flat tip at the end of it, will slide into. The spring with the flat tip on the end will push up against the inside of the cam follower if you look in the inside of the cam follower you will see a white gray spot.... put the cam follower back into the hole with flat area going IN against the camshaft:thumbsup:
11. Pull the cam follower out and inspect ALONG with looking at your camshaft as well
Pics of inside where the cam follower goes.
That would be the camshaft area that the cam follower rides along. The blue object is a small flashlight
Simply follow these steps backwards to reassemble!!!! MAKE SURE YOU PUT FRESH OIL BACK ON THE CAM FOLLOWER BEFORE INSTALLING IT BACK INTO THE MOTOR. If you do not do this, this could hurt the follower and camshaft do to the fact that you have two metal dry objects riding along each other. AND of course your motor always likes fresh oil. :thumbsup: ALSO the torque for the torx bits that hold the fuel pump in place is about 7 1/2 ft lbs DO NOT TORQUE THIS HEAVY!!! When installing the (silver) nut back onto the fuel pump thread it on, then tighten the top (Brass nut) somewhat tight, i think you all know how much is too tight dont crank the thing!! Same goes for the bottom (silver) nut and for the Pressure Reliefe valve. ANOTHER VERY VERY IMPORTANT STEP Make sure you prime your fuel pump after you have re-installed it onto your car. What you want to do is turn your ignition key just to where your inside lights come on etc.... DO NOT start the car. You will do this process 5 times @ each time wait 10 seconds then turn key to off position. STEPS:
1. Turn key to on position DO NOT start engine, wait 10 seconds, turn key to off position
2. Turn key to on position DO NOT start engine, wait 10 seconds, turn key to off position
Complete this process 5 times in a row BEFORE starting your engine. Once engine is started LISTEN for vaccum leaks (the hose i told you to take off next to the fuel pump location) LOOK around your fuel pump make sure you have no leakes. Let car idle for a minute or two
Questions IM ME:happyanim:
Last edited:
