Deezz_Nuttz
What's a User Title?
- Location
- So Cal
Note: Use only as a reference
Side Note: My gauge was already installed when I decided to do a DIY
Tools:

Wire Cutter/Splicer, X-acto Knife, Diagonal Cutter Pliers, Flathead Screwdriver, Electrical Tape, Teflon Tape, 3M double-sided Tape

Standard 7/64"

Metric 3


Ratchet w/ Extension 14mm


Ratchet w/ Extension 10mm
These are the tools I used, if you can make do with what you got; do so
Lets begin:
I don't know if this has any significance... but Power off SAT radio

Pop-Hood and unscrew MAF using metric size 3 bit: (upper left corner)


Unclip the wires before pulling it out:

Pull it out and set aside:

Undo the clips (There are two):

Pull apart the tubing:

Unscrew the front part of the intake tube using the standard 7/64" bit:

Pull the tubing apart; Push it torwards the back and then up:

Try not to lose or drop these screw clips!

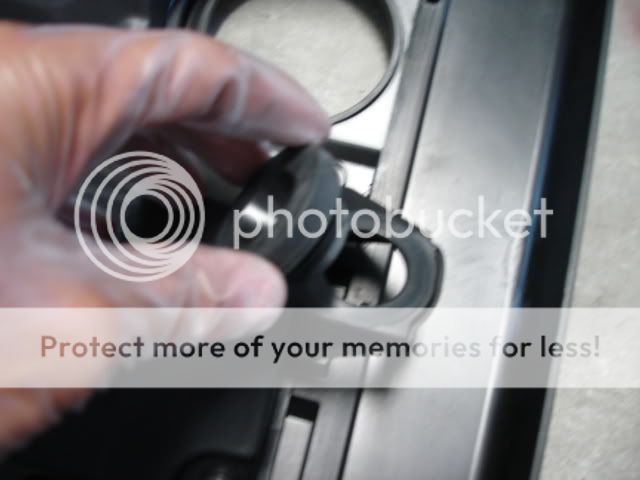
Now "Pop" off the engine cover. Pull upwards on the edges. There are four "gromets" that are holding it down:

You can see them, they are the round rubbers. (If you can't pull it off, don't be a pussy, you won't break anything just pull!)
Here is w/ the cover removed, you can see the fronts where the cover is connected to:

The rubber things may stay on the engine: remove and replace onto cover:

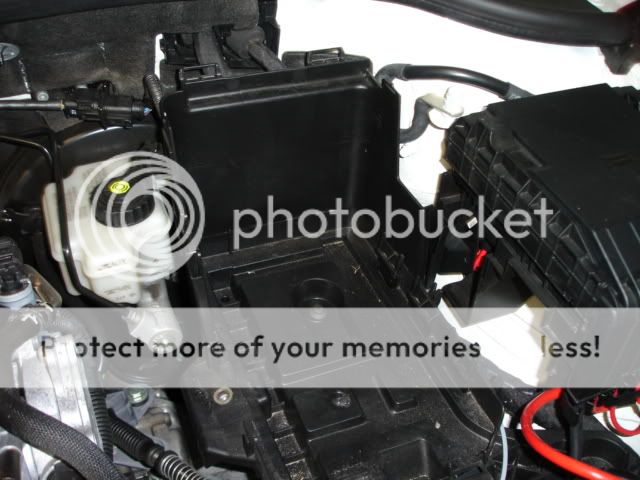
Remove Battery Cover:

The front part just pulls up and out:

Unscrew the negative Terminal using the 10mm ratchet:

Remove Wire:

Unscrew positive Terminal using the 10mm ratcher and remove wire:

Unscrew the Battery Tie Down using the Ratchet w/extention 14mm:

Remove and set aside:

Now you can take the battery out:
The rear cover is relatively hard to remove:

One side is easily accesible, the other takes a longer flathead screwdriver:

Just push the screwdriver down and it should unclip:

You have to remove the stock tube and replace w/ supplied T-Tube (I'm holding the stock tube):

Pretty tricky to remove, I used a flathead and just wiggled the clips loose.
Before you can fit the T-Tubing, you need to cut off Two "barbs" of the hard lined fitting using the X-acto Knife, Like I said mine was already installed. Here is a pic of the "barbs":

Make sure the "T" part of the tubing is on the underside and facing torwards the rear:

Attach the supplied Rubber Tubing to the T-Tube. The other side is for the nylon tube that goes to the boost gauge. The pic above shows the Rubber tube coming from the T-Tubing.
Insert the Nylon tube into the rubber tubing as far as you can go I'd say a good 1/2" is good enough, careful not to bend the tubing as it make cause air leaking and inaccurate boost readings.
Now to feed the nylon tube into the cabin >>
Remove the wires behind the battery out of the way:

Here you can see the nylon tube going into the spot where you need to punch a hole w/ the X-acto Knife

Feed the nylon tubing to the cabin.
Now take a break coz the next parts are a bitch

Reposition the wheel down and out as much as possible:


^ Side shot of the finished product (your almost there)
Pull the top "cover" torwards you and it will come off (it's attached by the leather):

Now also remove the cover that its attached to:

Remove the side fuse cover, there is a latch where a flathead will fit:


Replace any clips that come off:

Go back to the wheel and uncrew this torx using the standard:

More torx under:

Now remove the headlight switch (push and rotate clockwise, and you can pull it out):

Now you can unclip the Headlight switch, push on the side and it will come off:

/no pics
Remove the cover it should pop off once the four screws are removed, before you can completely remove it, you need to unclip the dimmer switch. The same as the headlight switch.
Find the nylon tube that you passed through, feed it next to the steering wheel. Pass the nylon tube through the column pod. Also pass the Gauge wires through the column pod. Use the supplied hardware to connect the nylon tubing to the boost gauge. I highly recommend you use some teflon tape to ensure you don't lose any air, apply some in the back of the gauge as well as with the hardware you use to screw in the nylon tube
/end no pics
There is a cover on the dimmer wires, you need to cut that cover, CAREFUL NOT TO CUT THE WIRES INSIDE!:
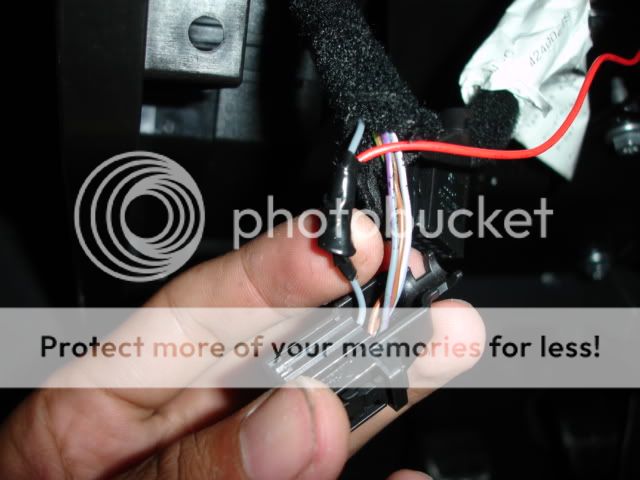
You can see where I spliced the power wire from the boost gauge there ^ edit: for you color blind ppl, its a solid GRAY wire you need to splice
Here is a good place to ground the gauge:

NewSouth Performance Instructs to remove a peace of this part (the part that holds the leather) to be able to "hide" the wires:

I said "Fuck That", I just used the X-acto Knife and poked a small hold in the leather, low and to the left side to feed the wires/nylon tubing:

^If your going to poke a hole, and you already wired the damn thing. You gotta remove the wires and feed through that hole. Along with the nylon tubing.
Your done.
Pop back steering wheel covers and test fit the column pod.
Use the 3M double sided tape to secure the column pod on top of the original cover.
Replace all the interior parts and zip tie the nylon tubing AWAY from any parts that might get hot and "melt" the tubing.
Replace Battery and Battery Cover.
Replace the Engine Cover.
Re-Screw the Intake "hose" pop back the tube by the MAF, Re-clip the clips. Re-Screw the MAF.
Turn on ignition and turn on headlights to see if the gauge lights up.
Turn on your car and look at the reading. It should read 20hg, anymore or less? Check for any leaks in your tubing.
FYI: Anytime you disconnect the battery for a "long" period of time, the warning lights will stay on. They will disappeare after drivng a bit.
Note: Check your cruise control, make sure its back to the "off" position.
It feels like you don't have power steering anymore? The column pod is rubbing agains the wheel. Remove and sand down as neccesary.
Side Note: My gauge was already installed when I decided to do a DIY
Tools:
Wire Cutter/Splicer, X-acto Knife, Diagonal Cutter Pliers, Flathead Screwdriver, Electrical Tape, Teflon Tape, 3M double-sided Tape
Standard 7/64"
Metric 3
Ratchet w/ Extension 14mm
Ratchet w/ Extension 10mm
These are the tools I used, if you can make do with what you got; do so
Lets begin:
I don't know if this has any significance... but Power off SAT radio
Pop-Hood and unscrew MAF using metric size 3 bit: (upper left corner)
Unclip the wires before pulling it out:
Pull it out and set aside:
Undo the clips (There are two):
Pull apart the tubing:
Unscrew the front part of the intake tube using the standard 7/64" bit:
Pull the tubing apart; Push it torwards the back and then up:
Try not to lose or drop these screw clips!
Now "Pop" off the engine cover. Pull upwards on the edges. There are four "gromets" that are holding it down:
You can see them, they are the round rubbers. (If you can't pull it off, don't be a pussy, you won't break anything just pull!)
Here is w/ the cover removed, you can see the fronts where the cover is connected to:
The rubber things may stay on the engine: remove and replace onto cover:
Remove Battery Cover:
The front part just pulls up and out:
Unscrew the negative Terminal using the 10mm ratchet:
Remove Wire:
Unscrew positive Terminal using the 10mm ratcher and remove wire:
Unscrew the Battery Tie Down using the Ratchet w/extention 14mm:
Remove and set aside:
Now you can take the battery out:
The rear cover is relatively hard to remove:
One side is easily accesible, the other takes a longer flathead screwdriver:
Just push the screwdriver down and it should unclip:
You have to remove the stock tube and replace w/ supplied T-Tube (I'm holding the stock tube):
Pretty tricky to remove, I used a flathead and just wiggled the clips loose.
Before you can fit the T-Tubing, you need to cut off Two "barbs" of the hard lined fitting using the X-acto Knife, Like I said mine was already installed. Here is a pic of the "barbs":
Make sure the "T" part of the tubing is on the underside and facing torwards the rear:
Attach the supplied Rubber Tubing to the T-Tube. The other side is for the nylon tube that goes to the boost gauge. The pic above shows the Rubber tube coming from the T-Tubing.
Insert the Nylon tube into the rubber tubing as far as you can go I'd say a good 1/2" is good enough, careful not to bend the tubing as it make cause air leaking and inaccurate boost readings.
Now to feed the nylon tube into the cabin >>
Remove the wires behind the battery out of the way:
Here you can see the nylon tube going into the spot where you need to punch a hole w/ the X-acto Knife
Feed the nylon tubing to the cabin.
Now take a break coz the next parts are a bitch
Reposition the wheel down and out as much as possible:
^ Side shot of the finished product (your almost there)
Pull the top "cover" torwards you and it will come off (it's attached by the leather):
Now also remove the cover that its attached to:
Remove the side fuse cover, there is a latch where a flathead will fit:
Replace any clips that come off:
Go back to the wheel and uncrew this torx using the standard:
More torx under:
Now remove the headlight switch (push and rotate clockwise, and you can pull it out):
Now you can unclip the Headlight switch, push on the side and it will come off:
/no pics
Remove the cover it should pop off once the four screws are removed, before you can completely remove it, you need to unclip the dimmer switch. The same as the headlight switch.
Find the nylon tube that you passed through, feed it next to the steering wheel. Pass the nylon tube through the column pod. Also pass the Gauge wires through the column pod. Use the supplied hardware to connect the nylon tubing to the boost gauge. I highly recommend you use some teflon tape to ensure you don't lose any air, apply some in the back of the gauge as well as with the hardware you use to screw in the nylon tube
/end no pics
There is a cover on the dimmer wires, you need to cut that cover, CAREFUL NOT TO CUT THE WIRES INSIDE!:
You can see where I spliced the power wire from the boost gauge there ^ edit: for you color blind ppl, its a solid GRAY wire you need to splice
Here is a good place to ground the gauge:
NewSouth Performance Instructs to remove a peace of this part (the part that holds the leather) to be able to "hide" the wires:
I said "Fuck That", I just used the X-acto Knife and poked a small hold in the leather, low and to the left side to feed the wires/nylon tubing:
^If your going to poke a hole, and you already wired the damn thing. You gotta remove the wires and feed through that hole. Along with the nylon tubing.
Your done.
Pop back steering wheel covers and test fit the column pod.
Use the 3M double sided tape to secure the column pod on top of the original cover.
Replace all the interior parts and zip tie the nylon tubing AWAY from any parts that might get hot and "melt" the tubing.
Replace Battery and Battery Cover.
Replace the Engine Cover.
Re-Screw the Intake "hose" pop back the tube by the MAF, Re-clip the clips. Re-Screw the MAF.
Turn on ignition and turn on headlights to see if the gauge lights up.
Turn on your car and look at the reading. It should read 20hg, anymore or less? Check for any leaks in your tubing.
FYI: Anytime you disconnect the battery for a "long" period of time, the warning lights will stay on. They will disappeare after drivng a bit.
Note: Check your cruise control, make sure its back to the "off" position.
It feels like you don't have power steering anymore? The column pod is rubbing agains the wheel. Remove and sand down as neccesary.
Last edited:


