GOLFMK8
GOLFMK7
GOLFMK6
GOLFMKV

Blown turbo? Maybe?

vwengineer

Ready to race!
Location
Switzerland
It might be the valves more than the pistons if adding oil does not increase compression. You should check the cam chain (this one is easy) and eventually the timing belt to see what went wrong
 

GTI's

Drag Racing Champion
Location
MD
Take off your valve cover and take a look at the exhaust camshaft curious if it snapped after cylinder number 1.
 

1131

Passed Driver's Ed
HNY, everyone. I wish mine were, but looks like I'm starting off in the hole.

The only thing I've managed to accomplish this past week is some pricing research.

One VW dealer wanted
$3258 for a head + $3000 labor = ~$6258.
$5500 for new engine+ $2800 labor = ~ $8300

Another dealer wanted
$3498 labor for an engine swap
Recommended against a head swap. Said 9 times out of 10 if the top is messed up, the bottom is messed up as well. He immediately lost my trust saying that. I think the exact opposite ratio is true. I think he just didn't want to deal with scraping off the old gasket.

3rd dealer wanted
$4839 for rmfd engine +$2737 labor = ~ $7576

An independent shop wanted
$2500 for a head + $2000 labor = ~$4500

Again. Just as a reminder. The car has a wholesale value of about $2K. I see people still asking around $5K for a MKV even with high mileage. You could get a used MKV for as much as these shops are quoting. I think a professional repair is out of the question.

I understand that it's IMPERATIVE that I first determine the cause of failure before doing anything. But In doing my research I wanted to see what is involved with doing a head swap and whether I might be able to do it myself. One of the reasons I found the courage to do the turbo swap myself was because there was a step-by-step guide available. I can get a used head off ebay at an almost affordable price. I found a few YouTube videos on complete engine removal (some of which are pretty horrifically amateur -- you can tell they're just winging it), but I haven't seen a single head swap in situ. Do any of you know of a good guide or video for such a thing? I'd prefer not to wing it.

It might be the valves more than the pistons if adding oil does not increase compression. You should check the cam chain (this one is easy) and eventually the timing belt to see what went wrong

Correct. That is what I meant.

Take off your valve cover and take a look at the exhaust camshaft curious if it snapped after cylinder number 1.

Does that ever really happen? That sounds completely nuts!

One of the VW dealers I spoke with recommended taking a peak at my cylinders using a borescope. That's not a bad idea, but I think the compression test already tells most of the story. I might pick up a cheap WiFi-based scope the next time I see one on sale on Amazon.
 
Last edited:

vwengineer

Ready to race!
Location
Switzerland
The guy who took the head off mine (thinking the valves were shot after the chain broke), while not a VW tech, said it is almost not possible to do it with the engine in the car. So it's a big job.

But if you are willing to do it, you should better get the head repaired than buying a random one on eBay, the last thing you want is to find out that the head gasket does not seal because the head is wrapped.

If you can find a used engine, that might be the easiest route.
 

GTI's

Drag Racing Champion
Location
MD
Only you can decide if it is worth the cost to repair by a professional or shade tree mechanic on a 13yr old car with 140K. I see cars with this type of damage for sale every so often on CL for $1k or less.

Someone will need to determine what exactly went wrong and what is needed to make repairs, perhaps just a timing set and replace the valves. I know that some have done it on the cheap and just swapped out the bent valves and call it a day.

The head can be swapped out with the engine in the car although it would be easier to do the head, timing set, water pump etc with it on a stand.

The camshafts used on these cars are not solid but hollow and multipiece. Broken exhaust cam after cylinder number 1


Best purchase you can make with these cars is to get a one day subscription to erWin for about $30 and download all related repair/service info on your car based on the VIN, make sure you have a way to save /copy in Pdf . The Pelican DIY is interesting but does not list any torque values etc.
 

1131

Passed Driver's Ed
For make benefit of the two people who are reading this thread, I give update. I decided to spring for a borescope. It's too important to wait for a sale. I got one of the supposedly nicer ones, a Depstech 5.0MP with 3rd generation processor, because the difference in price between the nice borescopes (~$40) and the cheapest is only about $20. Well... it turns out you still need to hold your hand supersteady while taking pics.

I also spaced out and put the cylinders at TDC when I really should have put them at BDC to inspect the cylinder walls. I had a difficult time removing even the upper timing cover. However, it is possible to flex it back far enough to see the arrow on the back point to the notch in the gear. Someone was also nice enough to put a blue dot on that tooth for me.
tdc.jpg

Why did they get rid of the inspection window after mid 2006?

I had to eyeball 180 degrees worth of manually cranking the crank pulley between cylinders. In any case, the cylinder heads don't appear to be cracked nor even show impact damage. Ironically, the one cylinder that shows some scratch marks is the only one that still shows good compression. Here they are in firing order: 1,3,4,2:

cyl1.jpgcyl3c.jpgcyl4.jpgcyl2.jpg

The shiny spot in cylinder 3 is most likely the capful of oil I drizzled down into the chamber for the wet compression test.

I envisioned either using the 45-degree mirror attachment or folding the borecope wire back on itself to check for valve damage. But the attachment wasn't adequate to the task. I had a surprising amount of difficulty just getting the scope down through the spark plug hole, I was fairly certain I'd get the camera stuck in there if I tried to fold the wire. So it looks like removing the cylinder head will be my best option for inspection. And that will take an entire day.

I did inspect the camshafts. Both are intact. At TDC, the lobes at #4 are mirror images of eachother as they should be.
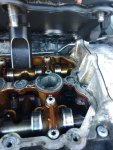
lobes.jpg

I (eventually) removed the camchain cover. Holy cow. Nobody warns you just what a PITA it is to take that off. To even get to it, you need to remove the hpfp (if you're wondering, my follower looked fine) and brake booster vacuum. Every. Single. Screw is blocked by something. I ended up using a 4mm allen key to remove them Yes, I dropped the key in the middle of the job and had to go out and buy another one. There are 8 screws. Naturally I missed one before herniating myself trying to get the cover off.

There is also a coolant hardline in the way. You need to remove the hose clamps on either side of this hardline, then remove the heatshield for the turbo with the coolant line attached to it. Charles (aka The Humblemechanic) warns people on his hpfp video not to even LOOK at the coolant return flange. Yup. I broke mine.
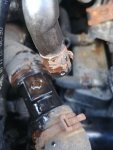
broken coolant fitting.jpg

As Han Solo would say, I didn't even hit it that hard. I temporarily stabilized it by jamming a body fastener into the hole. I did manage to get my mits on the Bentley, Chilton, AND Haynes guides (though it seems the Chilton and Haynes are exactly the same except with a different font). For all its thickness, the Bentley isn't necessarily better than the Haynes or Chilton guides. Half the Bentley is comprised of wiring diagrams and a complete printout of every single DTC possible. Both the Haynes and Chilton summarize removal of the camshaft chain cover with a single sentence:

Step 8. Remove fasteners from timing cover.

Nice.

So here was my reward for all that hard work:
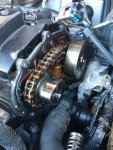
camchain.jpg

Nothing obviously wrong. Chain is intact. I push down on the tensioner. It resists me. I turn the crank pully and the camshaft chain moves. The tensioner on the timing belt side is also fine. Timing belt is taught. But isn't there supposed to be at least one colored chainlink on the camshaft chain? I am unable to determine if it is in correct time.

So that's where I'm at right now. I assume I have valve damage and that I can attempt to do either a valve job or a head swap. It bothers me that I still don't have a handle on WHY the damage happened. Without this knowledge, I worry that I can spend $60 or $600 or $6000 trying to repair this only to have it break exactly the same way another 2 miles down the road.

I think what I'm going to do is have the car towed to my parents' place. That's just about the only place I can work on the vehicle in a covered garage off and on over the course of weeks or months if necessary. I'm going to treat this as a junkyard salvage project because that's kind of what it is at this point
 
Last edited:

vwengineer

Ready to race!
Location
Switzerland
Thanks for the update, that's puzzling. The timing seems OK according to the timing belt although there is also the crankshaft timing mark to look for I think although I see no reason for the timing belt to be out of time.

The cam chain being OK does not mean it is timed correctly especially as the tensioner relies on oil pressure (the spring that you felt is not sufficient). To check the timing, you would need the camshaft locking tool, mark the actual timing, remove the chain, lock the cams using the tool and see if the timing marks you did are aligned.

What's strange is that it does not look as if there was damage on the pistons.
 

vwengineer

Ready to race!
Location
Switzerland
Another test you can do, if you remove the intake manifold, you will have a direct look on the intake valves, now if you turn the engine so that the valves of a particular cylinder are closed and you put some liquid on them, they should not leak (or at least not more than cylinder 1).
 

1131

Passed Driver's Ed
Another test you can do, if you remove the intake manifold, you will have a direct look on the intake valves, now if you turn the engine so that the valves of a particular cylinder are closed and you put some liquid on them, they should not leak (or at least not more than cylinder 1).

Yes, removing the intake manifold is step one for removing the cylinder head. But I think valve damage is a given at this point. There is no other way to explain a zero value on a compression test. The bigger issue is determining WHY it happened so that it doesn't happen again.

I'm not seeing any obvious timing marks on the cam chain or its cover. That would probably be helpful.
 

vwengineer

Ready to race!
Location
Switzerland
There are none, you need the cam locking tool which will lock both camshaft in sync. I think that they are in opposition with each other when in sync. You can probably find pictures on Internet
 
Last edited:

1131

Passed Driver's Ed
There are none, you need the cam locking tool which will lock both camshaft in sync. I think that they are in opposition with each other when in sync. You can probably find pictures on Internet

I'm finding very little information about how to confirm relative time between the camshafts. The Haynes and Chilton describe a 3-sprocket system that doesn't even match the BPY setup. They also mention 3 special colored links in the chain which I don't have. The Bentley describes how to remove and reinstall the camshaft chain, but there is nothing in there about confirming timing. Basically, after locking the cams with the astronomically expensive Assenmacher tool (at cylinder #4 I guess? or does it not matter?) I put the chain over the intake cam, and rotate the intake shaft using another astronomically expensive Assenmacher 2-pin bent bar tool until the pin at the back of the camshaft adjuster lines up with the notch for it.

With an eye towards trying to understand why my engine became damaged, how do I know if my camshafts are in correct relative time without removing the chain as it sits now? Especially if my chain has no colored links? Remember, I did not get any camshaft correlation DTCs?

I see only ONE video on all of YouTube that apparently installs the camshaft chain correctly. But he makes a big deal about the one colored link and counting off 9 and 1/2 links and marking the midpoint. None of which must be necessary because my current chain doesn't even have colored links.

I also see two videos that are almost certainly doing it wrong. One guy doesn't bother using the Assenmacher tool and just uses a pair of channel locking pliers:

And here's this other guy who says that since you can be off by a single tooth on your alignment using the Assenmacher tool, there's no point in using it at all. For some reason he's decided to remove the camshaft frame to do the alignment. He does a lot of other things in his video that make think that whatever he's doing, I should probably do the exact opposite:

If I decide to replace my cam chain (and I probably will) is it necessary to buy the Assenmacher tool? Can I get away with a cheap generic? The guy from The Astral Auto Repairs video swears that it has to be the Assenmacher tool. Nothing else will do. This kit on ebay is pretty tempting for $20 complete with both tools AND locking pins.
 
Last edited:

vwengineer

Ready to race!
Location
Switzerland
You can buy a generic kit, they work apparently. You can be one teeth off but the engine will run without damage. Of course it would be better to have timing marks.

You can look at both camshaft, if there is no symmetry in their position, its probable that they are not in time (my guess only).

But then you didn't get the correlation error and that's strange. I don't see any other way for the valves to get bent though
 
Top