snwcrash
Passed Driver's Ed
- Location
- New Jersey
Was wondering if I could get some recommendations on a double-din dash kit. From your experiences which ones blend in best with the texture/color of the dash? I'm looking to mount a 7" wide Lilliput.


yep its mine - my write up is buried deep on another thread somewhere so I have cross posted it - it might be useful for you mike...
Even if your a COMPLETE noob (like me) you can still get a pretty good result with a little patience
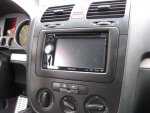
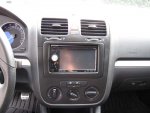
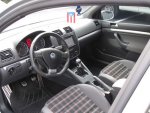
See below for notes on my Kenwood DDX-7039 with the BestKits surround

Luckily the factory surround is not textured and its painted a very dark flat grey - very noob friendly
The tips I picked up and tried to follow:
Materials:
Instant adhesive - I got good results from glueing the inner face surround to the main surround before I filled it.
Filler - use a plastic filler suitable for bumper repair or similar - not bondo or fiberglass - what you trying to do is match filler to the plastic of the surround as close as possible so it shrinks and expands the same (we dont want it cracking out)
Sandpaper - approx 200 grit wet paper for rough shaping, then 400, 800, 1200
Sanding block - one of the cork ones will be fine.
Alcohol prep wash - for wiping down before filling/painting
Masking Tape - protecting the edges from paint build up and overspray
Primer - use a plastic primer - again you can find bumper repair primer in a spray pack - the idea of this is to get a really good grip on the plastic
High build primer - may be required if the the plastic primer doesnt "build" enough to smooth out any marks
Finish coat - you can have your local paint shop colour match the factory surround in a matt finish spray pack. I have seen really good results with off the shelf flat black though.
Technique:
Most important be patient.
Protect the edges of the surround - from nicks, scratches and paint build up. Especially the inside edge around the head unit - try and keep this covered up and perfect until ready for the final coat.
The Best Kits surround is abs plastic and the grain sands off nicely. Take note of what your trying to match. The factory surround is smooth and FLAT. Try and keep the new surround flat to match. Flat surfaces with cleanly defined transitions and edges is what your going for - look at how the OEM dash is around the heater knobs for eg.
Always use a sanding block. Its really hard to apply even pressure with your finger tips
Dont be afraid of sanding. We want the absolute minimum amount of filler and primer to do the job so dont let it build up excessively - sand it back between coats.
Be clean - the tiniest bit of dust in the final coat will show up badly.
Method:
Sand the kit back with say 200 paper.
Wipe down with your prep wash.
If the kit is a 2 piece job like the BestKits one glue it together.
Fill any gaps with your plastic filler - work quickly and remember you will be sanding back.
As soon as the filler starts to harder sand roughly to shape.
Wipe down.
Apply filler in any low spots - sand - wipe - repeat as many times as you need to to get the shape right.
Spray on plastic primer. Use light coats. Keep the spray moving - start before the piece, spray across, stop when well past. Overlap each run.
Move up to 400 paper after maybe the second primer coat.
Repeat coats of primer or high build as required, sanding then wiping between coats until the surface is perfect. Finish with say 800 paper.
Apply the finish coats as above, sanding with 1200 paper and wiping between.
Let the finished job harden up before you do the final install.
Admire your work.
The ribs for single din fitting have to be carefully cut out...(Left Pic) After a few layers of filler (Right Pic)


Test fitting

After first coat of primer

Final result

the American international fits the best, and if you blend it in it looks very good...refer to the install i did here:
http://www.diymobileaudio.com/forum/buyfeatured.php?do=buy&t=47312
specifically:

>the American international fits the best, and if you blend it in it looks very good...refer to the install i did here:
http://www.diymobileaudio.com/forum/buyfeatured.php?do=buy&t=47312
specifically:
The connects2 dash kit looks pretty nice as well, there is a thread around here somewhere that has a pic of it...

