I just picked up a Black Forest Industries "Clean Catch" oil separator - it seems like a really nice catch can option. I decided to go with this particular can because the design seemed somewhat different from the other options on the market, it looks OEM when installed, and the folks at BFI were quite helpful and prompt in answering a few requests for additional information on their product and how it works. Also, the other cans have been done to death - it seemed like somebody needed to pull the trigger on the BFI can and post a comprehensive review. I certainly haven't had it installed long enough to really address a review yet, so that will have to wait for a later date.
What's in the Kit?
One thing the BFI kit does not include is instructions - I found that to be a pretty big oversight. They have instructions posted on their FSI product page, but the PDF it links to appears to actually be for the TSI solution. To further muddy the waters, the instructions are text-only; catch can installations are hardly complicated, but BFI certainly did their best to make things complicated by not including any accompanying paperwork at all with their kit. This PDF circle-jerk really pissed me off - for four bills, I would hope they could do better.
Now that we've concluded that bitchfest, we can get on to the kit - here's what you get:
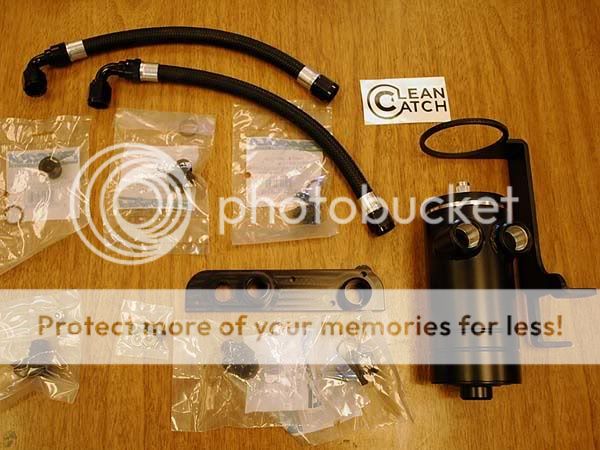
(1) 42DD PCV plate
(2) connectors w/ o-rings for this plate
(2) connectors w/ o-rings for the catch can
(1) intake manifold plug w/ double o-rings and a weird allen set screw
(1) plug w/ o-ring for catch can drain
(2) high-speed cool-guy hoses
(1) mounting bracket
(1) catch can
(1) bag containing (1) allen-head screw, (2) washers, and (1) nut
(1) sticker
BFI has a pretty good thread running here with a few official pictures of the product and how it is said to work.
The mounting bracket is very sturdy and the can itself is pretty nice - my one [minor and perhaps undeserved] reservation is the can finish - it appears to be painted and I'm not sure how long that will hold up if tools scratch against it over the years, etc. Again, it's way too early to make a call on that, but I was impressed with the overall quality of each component in the BFI kit.

The "V" baffle does not extend to the bottom of the can. BFI's illustrated picture sort-of demonstrates this, but it was hard to tell what was going on in their single top-view picture provided in the product thread I referenced earlier.

The dipstick unscrews from the top cap - I left it installed in the cap for this picture, but you can see the notches which are said to make it easier to read junk/crud levels:

Installation
1) Preliminary non-illustrated stuff: Start by unpacking all the individual connectors with their constituent o-rings - you might as well slip those o-rings on now. Go ahead and install the (2) PCV connector fittings into the PCV plate, as well as the (2) catch can connector fittings into the catch can inlet/outlet ports. Install the drain plug in the bottom of the catch can as well. Install the allen screw in the top of the intake manifold block-off plug.
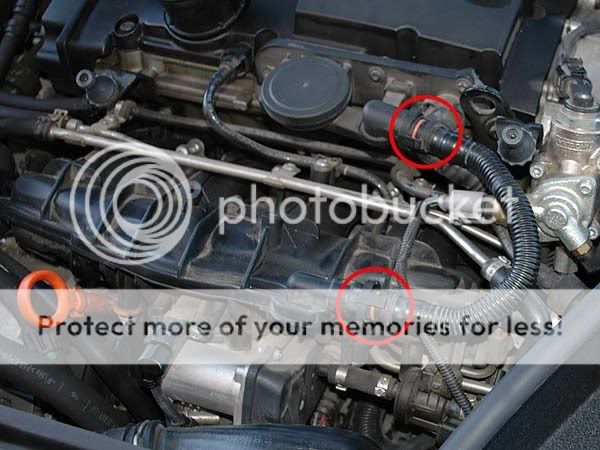
2) Next, we need to disconnect the factory PCV setup. Start by removing the accordion hose that connects the PCV valve to the intake manifold; pinch the sides of the connectors and gently-but-firmly pull the hose until it disconnects.
3) Proceed to install the BFI intake manifold block-off plug. This is accomplished by applying a light coat of oil to the two o-rings on the plug and simply pushing/twisting it into manifold. The plug does have a slit in it so that it can be rotated into position to "lock" against the plastic of the intake manifold to provide some sort of positive retention - this will keep it from working itself out under boost.

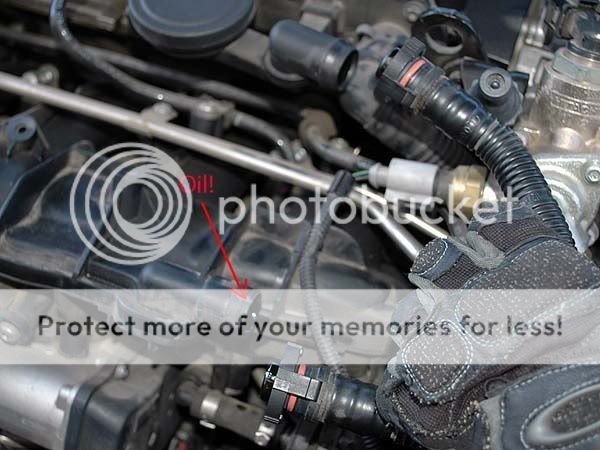
4) Now we need to disconnect the hose that connects the crank case to the valve cover - this is the hose on the driver's side of the PCV that has a weird looking 4 sided clip that locks the hose in place:

Use a flathead screwdriver to gently unclip each side while pulling on the hose. I had to attack one side at a time to get the clip to cooperate - take your time and do not break anything.
5) With that hose disconnect, we just need to unscrew the stock PCV plate. Use a Torx driver (T30?) to unscrew the (4) screws that retain the plate to the valve cover.

Once done, remove the stock PCV valve and plate and you should see something that resembles this:

I took a comparison picture of the stock valve next to the 42DD PCV plate that BFI uses in their kit:

6) Install the BFI/42DD PCV plate using your old gasket. Again, I might be nitpicking, but I would have liked to have gotten a new gasket after shelling out $400 for a catch can kit.

Re-attach the factory crankcase -> valve cover hose:

7) Now we need to install the mounting bracket near your windshield washer filler tube; the bracket uses an empty hole in the engine bay and also slides on top of the factory motor mount bolt/nut:

Use one washer on the screw provided to secure the bracket to the empty hole in the engine bay, and place the higher bracket hole over the motor mount nut; secure the bracket in place by installing the second wash over the bracket and screwing the provided nut down on top. Torque everything hand-tight and make sure it's all secure.
8) Almost finished. Hold the bottom portion of the catch can under the bracket; run the cap through the top of the bracket and thread it all together. When the cap is snug, the whole thing should be secure. Now it is just time to connect the hoses - they simply screw on to the connectors:

All Finished!
Make sure everything is tight and step back and admire your work - your high-dollar fancy catch can is now installed! This setup should now remove some of the oily vapor from the PCV gasses that are fed back into your intake just above the turbo inlet.

I'm not sure how easy it is going to be to drain this can - access to the plug at the bottom seems like a pain in the ass and I think I would make a total mess if it were the least bit full. If BFI comes out with a quick drain kit, that would probably be an ideal solution. In the meantime, I think I will remove the cap from the top of the can and use a large syringe to remove any junk the can catches.

All ready to go! I'll try to follow-up in the coming months/years with an update on how this kit performs. I live in TX, so I don't think I'll see nearly as much oil-fuel-water vapor as some of you guys see in colder climates. We shall see!
What's in the Kit?
One thing the BFI kit does not include is instructions - I found that to be a pretty big oversight. They have instructions posted on their FSI product page, but the PDF it links to appears to actually be for the TSI solution. To further muddy the waters, the instructions are text-only; catch can installations are hardly complicated, but BFI certainly did their best to make things complicated by not including any accompanying paperwork at all with their kit. This PDF circle-jerk really pissed me off - for four bills, I would hope they could do better.
Now that we've concluded that bitchfest, we can get on to the kit - here's what you get:
(1) 42DD PCV plate
(2) connectors w/ o-rings for this plate
(2) connectors w/ o-rings for the catch can
(1) intake manifold plug w/ double o-rings and a weird allen set screw
(1) plug w/ o-ring for catch can drain
(2) high-speed cool-guy hoses
(1) mounting bracket
(1) catch can
(1) bag containing (1) allen-head screw, (2) washers, and (1) nut
(1) sticker
BFI has a pretty good thread running here with a few official pictures of the product and how it is said to work.
The mounting bracket is very sturdy and the can itself is pretty nice - my one [minor and perhaps undeserved] reservation is the can finish - it appears to be painted and I'm not sure how long that will hold up if tools scratch against it over the years, etc. Again, it's way too early to make a call on that, but I was impressed with the overall quality of each component in the BFI kit.
The "V" baffle does not extend to the bottom of the can. BFI's illustrated picture sort-of demonstrates this, but it was hard to tell what was going on in their single top-view picture provided in the product thread I referenced earlier.
The dipstick unscrews from the top cap - I left it installed in the cap for this picture, but you can see the notches which are said to make it easier to read junk/crud levels:
Installation
1) Preliminary non-illustrated stuff: Start by unpacking all the individual connectors with their constituent o-rings - you might as well slip those o-rings on now. Go ahead and install the (2) PCV connector fittings into the PCV plate, as well as the (2) catch can connector fittings into the catch can inlet/outlet ports. Install the drain plug in the bottom of the catch can as well. Install the allen screw in the top of the intake manifold block-off plug.
2) Next, we need to disconnect the factory PCV setup. Start by removing the accordion hose that connects the PCV valve to the intake manifold; pinch the sides of the connectors and gently-but-firmly pull the hose until it disconnects.
3) Proceed to install the BFI intake manifold block-off plug. This is accomplished by applying a light coat of oil to the two o-rings on the plug and simply pushing/twisting it into manifold. The plug does have a slit in it so that it can be rotated into position to "lock" against the plastic of the intake manifold to provide some sort of positive retention - this will keep it from working itself out under boost.
4) Now we need to disconnect the hose that connects the crank case to the valve cover - this is the hose on the driver's side of the PCV that has a weird looking 4 sided clip that locks the hose in place:
Use a flathead screwdriver to gently unclip each side while pulling on the hose. I had to attack one side at a time to get the clip to cooperate - take your time and do not break anything.
5) With that hose disconnect, we just need to unscrew the stock PCV plate. Use a Torx driver (T30?) to unscrew the (4) screws that retain the plate to the valve cover.
Once done, remove the stock PCV valve and plate and you should see something that resembles this:
I took a comparison picture of the stock valve next to the 42DD PCV plate that BFI uses in their kit:
6) Install the BFI/42DD PCV plate using your old gasket. Again, I might be nitpicking, but I would have liked to have gotten a new gasket after shelling out $400 for a catch can kit.
Re-attach the factory crankcase -> valve cover hose:
7) Now we need to install the mounting bracket near your windshield washer filler tube; the bracket uses an empty hole in the engine bay and also slides on top of the factory motor mount bolt/nut:
Use one washer on the screw provided to secure the bracket to the empty hole in the engine bay, and place the higher bracket hole over the motor mount nut; secure the bracket in place by installing the second wash over the bracket and screwing the provided nut down on top. Torque everything hand-tight and make sure it's all secure.
8) Almost finished. Hold the bottom portion of the catch can under the bracket; run the cap through the top of the bracket and thread it all together. When the cap is snug, the whole thing should be secure. Now it is just time to connect the hoses - they simply screw on to the connectors:
All Finished!
Make sure everything is tight and step back and admire your work - your high-dollar fancy catch can is now installed! This setup should now remove some of the oily vapor from the PCV gasses that are fed back into your intake just above the turbo inlet.
I'm not sure how easy it is going to be to drain this can - access to the plug at the bottom seems like a pain in the ass and I think I would make a total mess if it were the least bit full. If BFI comes out with a quick drain kit, that would probably be an ideal solution. In the meantime, I think I will remove the cap from the top of the can and use a large syringe to remove any junk the can catches.
All ready to go! I'll try to follow-up in the coming months/years with an update on how this kit performs. I live in TX, so I don't think I'll see nearly as much oil-fuel-water vapor as some of you guys see in colder climates. We shall see!