Bryan06GTI
On my best behavior
- Location
- Daytona
- Car(s)
- 06 GTI
Ok the DIY back up cam install guide..

This is just the way i did it.. i am no way responsible for any damage or or injury or mishaps that may happen along the way... if you dont know what you are doing get some professional help this is pretty serious install and dont attempt it with out the proper tools or know how..
Tools you might what to have around.
- Screwdriver ( Both Phillips and flat )
- torx bit set with ( the star shaped tips )
- screw driver for set above ^^
- Hydraulic jack with jack stands and wheel chucks
- wire splices and wire cutters
- Electrical tape or soldering iron
- Tire iron ( both back wheels will be coming off for this install )
Ok first thing you want to do is remove the right side license plate light..
For the license plate lights, there are simply 2 phillips screws on each side. Just unscrew them, and them pry the plastic cover off (the light bulb will come out with the cover). once the bulb is out pry out the housing.
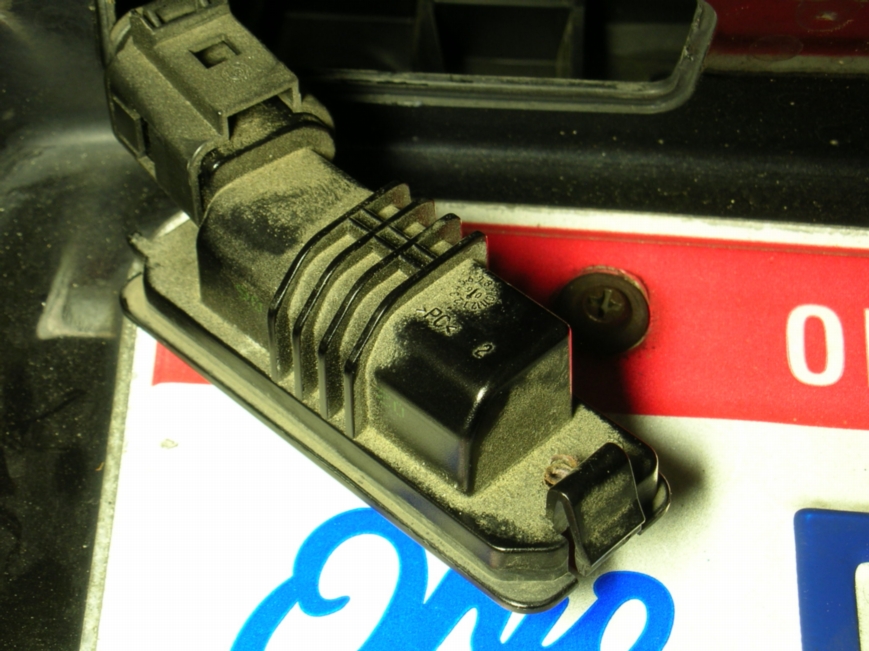
Remove the connector from the housing..

now you will need to splice NOT CUT the two wires ( should be a solid brown and a Brown with a lilac strip on it ) The Brown is the ground and the brown with the lilac strip is positive ) Now hook up the Red to the positive and the black to the ground.. ( i tested mine before is hooked every thing up with the wires spliced turn on the lights and touch the corresponding wires with led wires and see if it lights up. )
Now if you are confused as to which wire you will be hooking up on this install it is the shorter wire coming out right above the LED.
now that this is done you can hook up the led now or wait till the install is completely done. i waited.... i put some electrical tape over the spliced wire for the time being until i was ready to mount the camera.
Ok now the easy part is done.. go grab a drink and maybe a snack cause this is going to take a bit.
Take everything out of the trunk.. liner, spare, foam inserts and you should see this rubber grommet looking thing on the floor of the trunk

if you notice in the picture the plastic trim along the hatch has been removed.. you should also take these out to gain easier access to the 12volt socket in the trunk. That is whats going to power your back up cam. once all this is out.
Ok now the back bumper has to be removed but not all the way.. just follow these steps to remove all the screws and tail lights
Both back wheels also need to come off to get at the screws in the wheel wells.
http://forums.vwvortex.com/showthread.php?3754634
The bumper does not need to come off all the way.. mainly just the passenger side a bit just to feed the wires through the bumper.. you want feed the wires from the license plate light so they can travel along the back bumper.. you might see the wires for the plate lights.. follow those and drop them out by the passenger side.. Remember that rubber grommet that is how the wires are getting into the car. feed the wires along the back bumper as i stated then feed them through the grommet.. it is easier to pull the grommet out and feed the wires through then once that is feed though seal it back up with duct tape or what every you have..
Once that is done the hard part is over.. pop the bumper back into place put all screws back in and wheels back on. almost there now!!
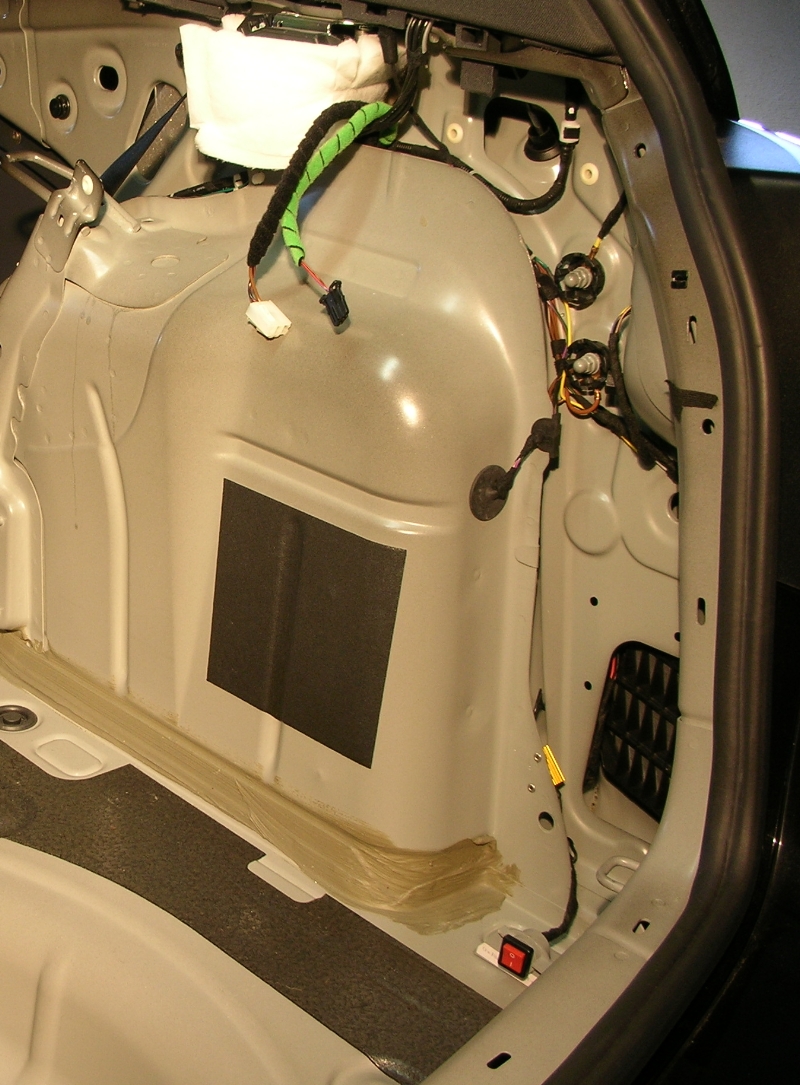
-Note the Top trim piece and carpet with the 12V socket doesnt need to be removed all the way just pop it out a bit so you can gain access to the 12v connector.
Once the bumper and wheels are back on you are going to do some more splicing.. in the picture above ^^ you will see a neon green wrapped wire and a black wrapped wire.. THE BACK WRAPPED is the connector to the 12v socket.. that is what is going to power the back up cam.. the RED AND LILAC is the power and the brown is ground. Now the longer wire with the red and black leads is going to hook up to these.. splice and hook up the positive to the RED AND LILAC and the black to the BROWN..electrical tape or solder when finished..
now the last cable with the yellow hook up just needs to be ran up the the headunit.. i ran mine along the passenger side to the front seat.. went under the seat and came out where the OEM SAT box is.. there is a trim panel along the bottom of the center console which can be removed fairly easy.. pop off the little plastic cover blocking the screw and remove the lower trim. once that is off you should be able to see the wires from the back of the Headunit.. its easier to do when the Headunit is removed ( lets more light in to see ) hook it up to the yellow female connector that says camera and you are DONE!!!
Now hook up the LED then Electrical tape or solder then insert the camera into place
Please do not attempt if you do not have jack stands.. the OEM Jack is not an option... they dont call it a widow maker for nothing.. please use the proper tools and have fun..
This is just the way i did it.. i am no way responsible for any damage or or injury or mishaps that may happen along the way... if you dont know what you are doing get some professional help this is pretty serious install and dont attempt it with out the proper tools or know how..
Tools you might what to have around.
- Screwdriver ( Both Phillips and flat )
- torx bit set with ( the star shaped tips )
- screw driver for set above ^^
- Hydraulic jack with jack stands and wheel chucks
- wire splices and wire cutters
- Electrical tape or soldering iron
- Tire iron ( both back wheels will be coming off for this install )
Ok first thing you want to do is remove the right side license plate light..
For the license plate lights, there are simply 2 phillips screws on each side. Just unscrew them, and them pry the plastic cover off (the light bulb will come out with the cover). once the bulb is out pry out the housing.
Remove the connector from the housing..
now you will need to splice NOT CUT the two wires ( should be a solid brown and a Brown with a lilac strip on it ) The Brown is the ground and the brown with the lilac strip is positive ) Now hook up the Red to the positive and the black to the ground.. ( i tested mine before is hooked every thing up with the wires spliced turn on the lights and touch the corresponding wires with led wires and see if it lights up. )
Now if you are confused as to which wire you will be hooking up on this install it is the shorter wire coming out right above the LED.
now that this is done you can hook up the led now or wait till the install is completely done. i waited.... i put some electrical tape over the spliced wire for the time being until i was ready to mount the camera.
Ok now the easy part is done.. go grab a drink and maybe a snack cause this is going to take a bit.
Take everything out of the trunk.. liner, spare, foam inserts and you should see this rubber grommet looking thing on the floor of the trunk
if you notice in the picture the plastic trim along the hatch has been removed.. you should also take these out to gain easier access to the 12volt socket in the trunk. That is whats going to power your back up cam. once all this is out.
Ok now the back bumper has to be removed but not all the way.. just follow these steps to remove all the screws and tail lights
Both back wheels also need to come off to get at the screws in the wheel wells.
http://forums.vwvortex.com/showthread.php?3754634
The bumper does not need to come off all the way.. mainly just the passenger side a bit just to feed the wires through the bumper.. you want feed the wires from the license plate light so they can travel along the back bumper.. you might see the wires for the plate lights.. follow those and drop them out by the passenger side.. Remember that rubber grommet that is how the wires are getting into the car. feed the wires along the back bumper as i stated then feed them through the grommet.. it is easier to pull the grommet out and feed the wires through then once that is feed though seal it back up with duct tape or what every you have..
Once that is done the hard part is over.. pop the bumper back into place put all screws back in and wheels back on. almost there now!!
-Note the Top trim piece and carpet with the 12V socket doesnt need to be removed all the way just pop it out a bit so you can gain access to the 12v connector.
Once the bumper and wheels are back on you are going to do some more splicing.. in the picture above ^^ you will see a neon green wrapped wire and a black wrapped wire.. THE BACK WRAPPED is the connector to the 12v socket.. that is what is going to power the back up cam.. the RED AND LILAC is the power and the brown is ground. Now the longer wire with the red and black leads is going to hook up to these.. splice and hook up the positive to the RED AND LILAC and the black to the BROWN..electrical tape or solder when finished..
now the last cable with the yellow hook up just needs to be ran up the the headunit.. i ran mine along the passenger side to the front seat.. went under the seat and came out where the OEM SAT box is.. there is a trim panel along the bottom of the center console which can be removed fairly easy.. pop off the little plastic cover blocking the screw and remove the lower trim. once that is off you should be able to see the wires from the back of the Headunit.. its easier to do when the Headunit is removed ( lets more light in to see ) hook it up to the yellow female connector that says camera and you are DONE!!!
Now hook up the LED then Electrical tape or solder then insert the camera into place
Please do not attempt if you do not have jack stands.. the OEM Jack is not an option... they dont call it a widow maker for nothing.. please use the proper tools and have fun..