GOLFMK8
GOLFMK7
GOLFMK6
GOLFMKV

MK5 GTI on the Cheap

doc280

Ready to race!
Location
North Carolina
Looks great! I am jealously following this as 2 of my doors and headliner need this.

It is time consuming, but not all that difficult. I had to purchase some more material so I could complete the passenger door. Most likely will not do the rear panels at this time, because they are in great shape.

By the way I am jealous of your Astros, they have a real chance this year.
 

baynehh

New to the game.
Location
Houston, TX
Car(s)
2009 GTI
It is time consuming, but not all that difficult. I had to purchase some more material so I could complete the passenger door. Most likely will not do the rear panels at this time, because they are in great shape.

By the way I am jealous of your Astros, they have a real chance this year.

The 'chance' continues! But I would totally trade their season for my headliner and door cards sitting tight lol!

It is good to know that time was the biggest factor on these!
 

ZiRiS

Sergeant
Location
Dallas, TX
Car(s)
'09 BMP GTI
I just had to put an engine (long block) into my GTI because the timing belt broke. The cost for it is ridiculous.
I used the same formula you have on the first page to find out my cost per mile.
I'm sitting at $1.10 right now but since I just put a whole new engine in it, I feel like I'll get WHOLE lot more miles out of it than dollars I have to put into it...at least, I hope so anyways.
Good luck getting to your goal of .10 per mile...I'm not sure I'll make it there with this one.
 
Last edited:

doc280

Ready to race!
Location
North Carolina
Halloween

Trying for that Mad Max look. IMG_20171031_163955-1024x768.jpg
 

doc280

Ready to race!
Location
North Carolina
The New Look.

I need to find a little time for an update, but I could not wait to show you guys, the new look.
 

Attachments

  • IMG_20171102_161424-1024x768.jpg
    IMG_20171102_161424-1024x768.jpg
    238.5 KB · Views: 506

doc280

Ready to race!
Location
North Carolina
Passenger Door Covered

Just being short of material cost me $22 bucks, but all in all I am not crying. I grabbed the torch and took the passenger panel apart and recovered it. I found the passenger panel a little more difficult to recover, but I got it done.
_________________________________________________________
Black headliner material......Ebay....... $22.00
-------------------------------------------------------------------------


Cost / Maintenance ---------- $5192.68
Miles Driven -------------- 6864
------------------------------------------------
Cost Per Mile ---------------- $0.76
 

Attachments

  • IMG_20170921_163400-1024x768.jpg
    IMG_20170921_163400-1024x768.jpg
    182.5 KB · Views: 487

doc280

Ready to race!
Location
North Carolina
Glossy Red Calipers

Ok I had to do something about the flat pinkish red calipers. Instead of taking them off and having them powder coated I choose to clean them, tape off what did not need painted, prime it with the clear Dupli-Color Adhesion Promoter (in my stock) and cleared them with Rust-Oleum High Performance Wheel, Clear. I also painted the splash shields and hubs black, with paint I had in my stock. They are a very bright glossy red now and very much easier to clean with just soap and water.
------------------------------------------------------------------------------

Rust-Oleum High Performance Wheel, Clear.......Walmart......$4.91
-----------------------------------------------------------------------------
Cost / Maintenance ---------- $5197.59
Miles Driven -------------- 6892
------------------------------------------------
Cost Per Mile ---------------- $0.75
 

Attachments

  • IMG_20170915_132742-768x1024.jpg
    IMG_20170915_132742-768x1024.jpg
    145.5 KB · Views: 445
  • IMG_20170915_133030-1024x768.jpg
    IMG_20170915_133030-1024x768.jpg
    144.5 KB · Views: 446
  • IMG_20170919_112112-1024x768.jpg
    IMG_20170919_112112-1024x768.jpg
    184.5 KB · Views: 454

vwengineer

Ready to race!
Location
Switzerland
Ok I had to do something about the flat pinkish red calipers. Instead of taking them off and having them powder coated I choose to clean them, tape off what did not need painted, prime it with the clear Dupli-Color Adhesion Promoter (in my stock) and cleared them with Rust-Oleum High Performance Wheel, Clear. I also painted the splash shields and hubs black, with paint I had in my stock. They are a very bright glossy red now and very much easier to clean with just soap and water.
------------------------------------------------------------------------------

Rust-Oleum High Performance Wheel, Clear.......Walmart......$4.91
-----------------------------------------------------------------------------
Cost / Maintenance ---------- $5197.59
Miles Driven -------------- 6892
------------------------------------------------
Cost Per Mile ---------------- $0.75
Thanks for your posts very interesting. I am myself the owner since 6'000 miles of a 192'000 miles 2005 Golf GTI, AXX engine but manual gearbox. Like yours mine holds really great, I just did the cam follower (which had never been changed) and it looked great, smooth with still a lot of material left (changed it anyway).

Also the timing belt has been done 40'000 miles ago along with the clutch (actually the previous owner did it because the cam chain broke but it didn't damage the valves). I changed

- The radio for an RCN-210 from China (was 57$ and allows Bluetooth calls and music which is all I need)
- Both thermostats which were stuck open
- The cam follower
- The clutch master cylinder
- The gearbox oil (shifts much smoother now)
- Added a cruise control
- The DV Valve which was leaking

Points that I still need to check are the bushings and suspensions because the steering wheel is not straight (although the tire are worn uniformely). The car used about 1/3 quart of oil (5W-30) for those 6'000 miles which is excellent.

If I do more work on the car I will keep you updated :)
Keep up the good work!
 

doc280

Ready to race!
Location
North Carolina
Thanks for your posts very interesting. I am myself the owner since 6'000 miles of a 192'000 miles 2005 Golf GTI, AXX engine but manual gearbox. Like yours mine holds really great, I just did the cam follower (which had never been changed) and it looked great, smooth with still a lot of material left (changed it anyway).

Also the timing belt has been done 40'000 miles ago along with the clutch (actually the previous owner did it because the cam chain broke but it didn't damage the valves). I changed

- The radio for an RCN-210 from China (was 57$ and allows Bluetooth calls and music which is all I need)
- Both thermostats which were stuck open
- The cam follower
- The clutch master cylinder
- The gearbox oil (shifts much smoother now)
- Added a cruise control
- The DV Valve which was leaking

Points that I still need to check are the bushings and suspensions because the steering wheel is not straight (although the tire are worn uniformely). The car used about 1/3 quart of oil (5W-30) for those 6'000 miles which is excellent.

If I do more work on the car I will keep you updated :)
Keep up the good work!

Yes please keep us updated.

I am jealous that you have regular access to some worlds most beautiful and exciting roads. My have had the opportunity to dive them myself and it was a fantastic experience.
 

doc280

Ready to race!
Location
North Carolina
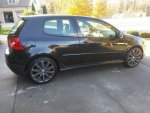
Axles....OFF ON OFF ON OFF ON OFF ON...............

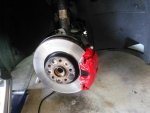
I have mentioned in the past the GTI has a clunk sound when coasting to a stop. Well that sound was coming louder and while clear coating the calipers I discovered something. While cleaning the right side caliper I had hold of the axle shaft and lost balance, took hold of the rotor, with my other hand, and the rotor turned. Ok, so what? The axle did not. There was a lot of play in the axle joint, CV joint, what ever you what to call it.

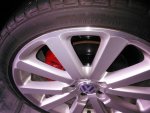
Ok, also mentioned before, both my axles look new and they are aftermarket.

Not mentioned before is they both have been weeping a yellow colored oil which has the pleasant aroma of gear oil. Mind you, they were not leaking from the boots, but from around the flanges and this really started during the hot days of summer.

The left axle also had some play in it, not as bad as the right one.

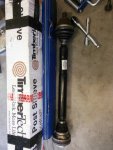
Shopping around I found a good "deal" on a new GS-P right axle and purchased it and held off buying a left one at this time. The picture showed this axle looking just like OEM and the description had it made in the USA. Upon its arrival the box said made in China and the axle looked just like the aftermarket one in the GTI. Great.....called the supplier they gave an additional $15 off and told me to give it a try. I installed it, test drove the GTI and had a new vibration. Plus after I parked the GTI in the garage and return to it there was a yellow puddle of oil on the floor (and that wonderful gear oil stink). This axle was returned for a full refund, including the return shipping, so nothing but time waisted. Well lets reword that statement, I have been educated on the ends and out of removing and installing and MK5 axle, so a plus.

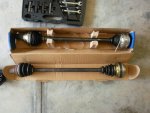
I know replacement axles has been discussed here, so I made the decision to go with OEM but new ones are way to expensive. Also it seems OEM axles are for the most part bullet proof except the boots. I found right and left OEM axles, used, on Ebay at a fair price. Both axles arrived and looked great. The install went good, but I discovered a split in the outer boot of the right axle......crap. Totally my fault for not doing a better inspection, because the seller stated it might need new boots.

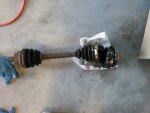
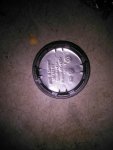
Take a look also at the picture of the left aftermarket axle, it fell apart when I removed it from the GTI. I also had to clean up the the gearbox, in this area, because it was coated in a yellow grease flim.

Now just for kicks until a replacement boot arrived I used E6000 adhesive to seal the split. I drove the GTI for about 150 miles until the replacement boot arrived and to my surprise the E6000 was still sealing the split. So for a short term fix until a boot can be replaced....E6000 works...keep this in mind.

Now boot kits are really messed up and pictures are sometimes not what you are buying. Lets take the GNK Loebro Boot Kit with axle bolt. The picture clearly showed the axle bolt, 12 point, but when the kit arrived no bolt..... a nut. Called about this and was first told my car took the nut ,not a bolt. Then another person said I was correct and they would send a bolt out, what they sent me was a Audi B5 bolt and that will not work. I threw up my hands and went to the dealer and purchased two axle bolts.

After doing my research I have come to the conclusion that Volkswagen MK5 axle boots are a maintenance item. The boots are going to split and I believe replacing the boots are about the best option. Anyone following the Humble Mechanic, on YouTube, will know he provides a lot of useful information and in his video on Volkswagen CV joints, he states CV boots are a 40,000 mile maintenance item.

I purchased a Rein CV Joint Boot Kit (without axle bolt), just to have on hand. Holy cow only one pack of grease and it is missing the large clamp. Palm Plant....

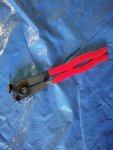
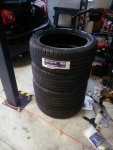
Oh about forgot, I purchased a tool for the boot clamps and since I am hoping not to be replacing axle boots everyday, I purchased a very cheap one for $9.00. Don't buy this one ( pictured below, look how it bent ) it is junk and even the seller agreed and refunded my money.* I will be purchasing a better tool when the time comes to change a boot again.

Here are the benefits of OEM axles over the aftermarket which came on my GTI.

Less vibration
No stink
No oil on my floor
Reduction in clunk sounds
Major reduction in torque steer

Out of these benefits let me address two of them.

Yes there is a reduction in the clunk sounds, but the OEM axles did not cure all. Best I can tell the remaining clunk, I have now, is coming from the duel mass flywheel area of the gearbox. Everything works great and if the radio is on the clunk can not be heard.

The reduction in torque steer. One way to fight torque steer, when using unequal length axles, is to try to get the axles to weigh the same. I really wish I weighed the the axles, but the right aftermarket axle weighed lot more than the OEM axle. My guess six to seven pounds more. The left axles were close in weight. The GTI drives and handles lot better now.

So if I had followed the advise about axles posted here and inspected my used parts better I could have saved a bit of time. But I know how to remove them and how to replace the outer boots which is not hard at all. Replacing the boots is messy because the grease seem to get everywhere, go by a Harbour Freight and get some nitrile gloves, a least 5mils, and a tarp to cover your work area. After your are finished just throw the gloves and tarp away.

OEM Right Axle...... Ebay.......$59.98
OEM Left Axle........ Ebay.......$69.99
2 OEM Axle Bolts ....Dealer....$21.63
GKN Loebro Boot Kit..Amazon..$16.99
Rein Boot Kit.........CarID.......$8.22
----------------------------------------------------------------------

Cost / Maintenance ---------- $5374.40
Miles Driven -------------- 7363
------------------------------------------------
Cost Per Mile ---------------- $0.73
 

Attachments

  • IMG_20170928_141227-1024x768.jpg
    IMG_20170928_141227-1024x768.jpg
    94.3 KB · Views: 417
  • IMG_20171030_180217-1024x768.jpg
    IMG_20171030_180217-1024x768.jpg
    165 KB · Views: 425
  • IMG_20171017_173830-768x1024.jpg
    IMG_20171017_173830-768x1024.jpg
    194.5 KB · Views: 419
  • IMG_20170928_114854-768x1024.jpg
    IMG_20170928_114854-768x1024.jpg
    196.3 KB · Views: 423
  • IMG_20170919_111542-1024x768.jpg
    IMG_20170919_111542-1024x768.jpg
    177.7 KB · Views: 421

doc280

Ready to race!
Location
North Carolina
Refurbishing Wheels on a Budget

My R32 wheels, which came with my GTI, have kissed and rubbed up against many a curb and some refurbishing is in order.

Having them professionally refinished was going to be to expensive. Selling them to offset the cost of new wheels, might have worked, but dealing with selling and shipping wheels prospect, did not seem like fun.

After researching different DIYs on refinishing wheels, I decided to use the Rust-Oleum High Performance Wheel Paint.

I was really surprised I was able to remove the curb rash by hand sanding and very little body filler.

For painting I followed Rust-Oleum's instructions except for one point. The instructions calls for the use of 400 grit sandpaper to be used to wet sand the primer. I found the 400 grit to be way to aggressive, with it removing he primer from the edges very easily. I used 1000 grit wet and found this to work very well.

I used dollar store playing cards, stuck between the tyre and wheel, to keep the paint off the tyres.

I thought the last step would be to wet sand and polish the clear coat, however it came out so smooth this would have been a waist of time.

The finishing touch for my new graphite gray wheels were a set of Wolfsburg center caps. Flip the center cap over and there is a VW part number and "Made In Germany", but came from China.

I wish I could take better pictures because the wheels look much better than what I can show you guys. The metal flake causes them to change colors from light gray to almost black, under different light conditions.

Sold the factory R32 center caps, since I will not be using them and this helped offset the cost of this project.
-------------------------------------------------------------------------------
4 X Rust-Oleum Self-Etching Primer ------ Wal-mart ------ $16.36
4 X Rust-Oleum Graphite Wheel Paint ---- Wal-mart ------ $16.48
4 X Rust-Oleum Clear Wheel Paint -------- Walmart ------- $19.64
3M Sand Paper (varity pack) -----------Advance Auto ------ $15.36
Bondo Body Filler -----------------------Advance Auto ------ $9.95
Wolfsburg center caps ------------------ Ebay ---------------- $9.95
2 X Playing Card Deck------------------- Dollar Store -------- $2.00
--------------------------------------------------------------------------------
Sold R32 center caps ----------------------------------- (-$54.00)
-----------------------------------------------------------------------------

Cost / Maintenance ---------- $5410.14
Miles Driven -------------- 7877
------------------------------------------------
Cost Per Mile ---------------- $0.69
 

Attachments

  • IMG_20171122_153102-768x1024.jpg
    IMG_20171122_153102-768x1024.jpg
    202.8 KB · Views: 370
  • IMG_20171122_153120-768x1024.jpg
    IMG_20171122_153120-768x1024.jpg
    139.1 KB · Views: 385
  • IMG_20171122_154006-1024x768.jpg
    IMG_20171122_154006-1024x768.jpg
    191.7 KB · Views: 371
  • IMG_20171122_154022-1024x768.jpg
    IMG_20171122_154022-1024x768.jpg
    196.7 KB · Views: 371
  • IMG_20171122_154401-1024x768.jpg
    IMG_20171122_154401-1024x768.jpg
    176.9 KB · Views: 374

doc280

Ready to race!
Location
North Carolina
New Snickers

Two of my Dunlop tires have developed bulges on the sidewalls, so it is time to replace them.

These showed up today and I should be able to get them mounted next week.
 

Attachments

  • IMG_20180112_151703-768x1024.jpg
    IMG_20180112_151703-768x1024.jpg
    171.4 KB · Views: 336
Top