GOLFMK8
GOLFMK7
GOLFMK6
GOLFMKV

Licence plate LEDs

RobbDizzle

Ambalamps Dispatcher
Location
Crystal Lake/Elgin, IL
Car(s)
07 VW GTI 5-door
So I can access the wiring for the rear plate lights to mount a load resistor from the passenger side rear wheelwell? And it's sitting right there behind the liner?
 

Raven6t9

Noise Pipe Plugs FTW!!!
Location
Nomadic
Car(s)
~MKV GTI~
So I can access the wiring for the rear plate lights to mount a load resistor from the passenger side rear wheelwell? And it's sitting right there behind the liner?
Thats what it sound like.

So good news guys, those Xenon white bulbs I got, I installed them and took NIGHT PICS!!!! YAY!!!
Theyre no brighter but the color of light is MUCH more desireable, well it might be a little brighter but not much. Im going to hopefully post pics tomorrow if I have time. But for 1.50 a bulb, and it being a direct replacement, its worth it. Im still going to keep the LEDs on my license plate, but all my other bulbs are going to be these xenon white bulbs!!:thumbup:
 

Raven6t9

Noise Pipe Plugs FTW!!!
Location
Nomadic
Car(s)
~MKV GTI~
Here it is guys, the pics of those xenon white bulbs. They look blue here, but they dont look blue at all in person, theyre very white and I can see better when going into reverse. Theyre not much brighter but a lot whiter, so the quality of the light looks better. If you look you can see the ONE LED in my license plate too, lol, I need to put that resistor in.
But these are the lights, and for $3.00 for both bulbs, it was very worth it!:thumbup:
But note how close these direct replacement xenon white bulbs are to the LED bulb in my license plate, pretty damn close!
 
Last edited:

felix_r32

racecar
Location
NYC
I just did my R32 yesterday and it is bright like hell!! They look like xenos and they are so bright that even the street below is white.

The plug for R32 and I guess for GTI is on the right hand side of the back bumper.


I made sure that the transistor does not touch any plastic pieces since it gets extremely hot.


Finished product


McCrash_mkv

Pre-Tuned in Deutschland
Location
Barcelona
Car(s)
08 UG GTI Euro Spec
holy shut..!!

Looks amazing...I want those LEDS on mine..and that 3.2 V6 too!! haha
Awesome dude..will be amazing if you can post a DIY (the existing one confuses me..the one that appears a TR GTI:...)

Thanks we'll aprecciate it!
 

felix_r32

racecar
Location
NYC
DIY is simple. Unplug the plug. Tap on both wires and connect the resistor, put electric tape and plug back and that's it. Simple!
 

Raven6t9

Noise Pipe Plugs FTW!!!
Location
Nomadic
Car(s)
~MKV GTI~
Give me a little bit, I took some good pics of the process when I did it to my GTI, I'll make a good write up on it.
 

McCrash_mkv

Pre-Tuned in Deutschland
Location
Barcelona
Car(s)
08 UG GTI Euro Spec
Yeah thanks! You r da man! :bow:
Give me a little bit, I took some good pics of the process when I did it to my GTI, I'll make a good write up on it.
 

ketchupfreak

Go Kart Champion
Location
Pasadena CA
So a friend helped me install the leds and resistor and Im having an issue right now where the leds only stay on for about 3 seconds then turn off. I am getting a bulb out light on my dash. What could the issue be?
 

felix_r32

racecar
Location
NYC
check the resistor. connect the resistor on the two poles of the battery. if it is working it should start getting warmer
 

Tbugsy

...optimism of the will
Location
Detroit
bump:

Raven, did you get that DIY for mounting the resistors done?

I'm trying to get license plate LEDs to work right now, except I have no clear idea 1) where to mount the resistors, and 2)how to wire the resistors. Sorry, mechanical/electrical NOOB.

thanks to anyone who can help.
 

akaprince

Ready to race!
Location
brooklyn, ny
Car(s)
2008 GTI BMP 2DR DSG
felix r32, the zip ties are such a good idea. :thumbup:
 

JetTurbo

geezer
Location
South Florida, USA
Car(s)
2018 GTi Autobahn 6M
LED license lights with interior resistor mounting

So I can access the wiring for the rear plate lights to mount a load resistor from the passenger side rear wheelwell? And it's sitting right there behind the liner?

bump:

Raven, did you get that DIY for mounting the resistors done?

I'm trying to get license plate LEDs to work right now, except I have no clear idea 1) where to mount the resistors, and 2)how to wire the resistors. Sorry, mechanical/electrical NOOB.

thanks to anyone who can help.

Figure I might as well add my 2¢ to this thread too :wink:

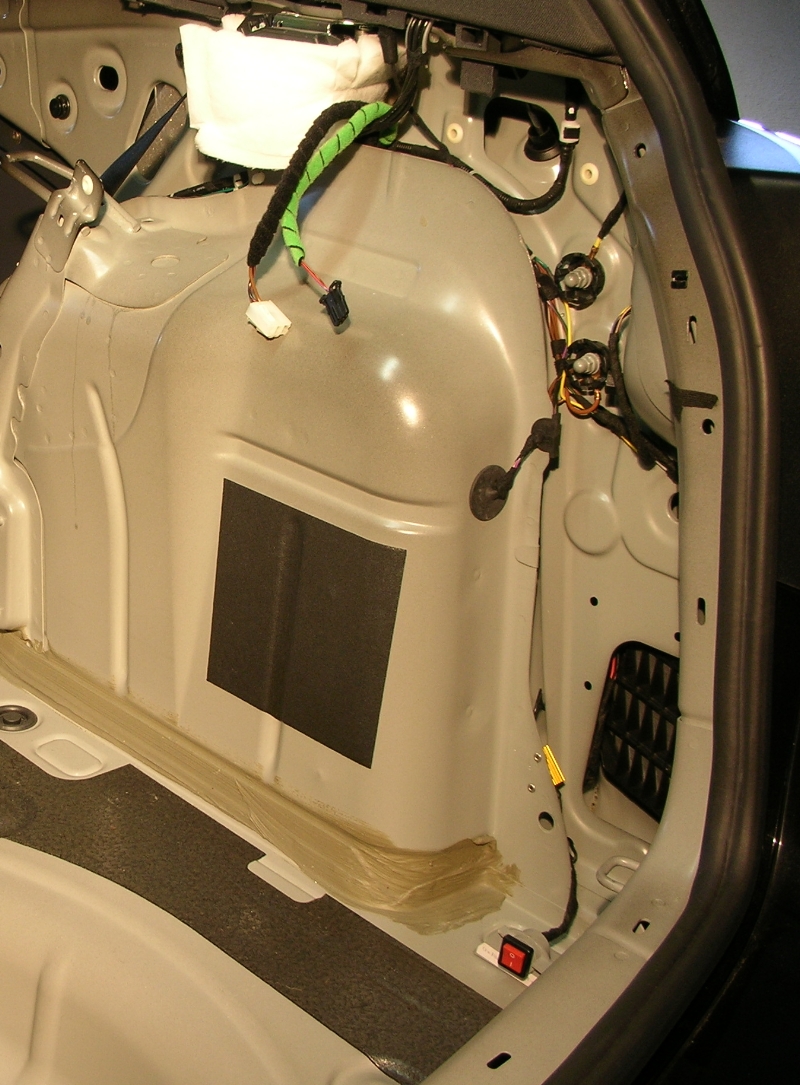
I chose to mount the necessary heat producing load equalizer / resistor inside the car. After removing the interior panels to access the harness, you will discover there is a fairly large plenum area behind the carpet. Even better, there is a metal area it can be mounted where there is absolutely no chance it will come in contact with the carpet. I have had mine mounted and functioning in this location for the last 25,000 miles.
No problems, no evidence of heat by hand checking the carpet cover anywhere near the resistor location. Checked it once while unloading luggage after traveling 800 miles in summer with lights on, no evidence of elevated temp whatsoever. The downside is all the panel removal to gain access - mounting outside is down and dirty - both figuratively and literally :wink:
--
Consulted a Bentley guide to remove panels. To remove the carpeted panel in the back, as per the Bentley, you are removing pretty much everything on top of it -- on a two door, you pull rear seats, front door sill trim, upper B-pillar trim, rear seat side trim, luggage cover side covers, trim around lower hatch opening - just to free the carpeted piece. I was running new wires for amber turns on LED tails at the same time, so all that was desirable for me anyway. Once you have access, it is straight forward electrical work.
---
I was concerned about long term issues, wanted to be able to fall back to original lamps should the need arise. So I added a switch to add or remove the load at will. The switch is not required. Load is wired in parallel, the switch is in series with the load.

--
After popping free two of the plastic tie down clips that hold the harness in place and removing some of the tape on the wire harness, I decide I better grab some kind of a 'before' picture. Once you are past the tail light junction, all that is left in this harness is the two conductors feeding the license plate lights, they run to the floor and through a grommet to the exterior location where Felix has mounted his resistor.


I chose to make the splice up high, the harness near the floor looks a bit delicate and I wanted to tie in between body mounting points. While I did not cut the wire, I cut the insulation, soldered in the new wire, heat shrunk ... < splice in progress >


... and taped it up after completing the splice ...


Mounted the resistor nearby in a blind pocket behind the carpet. the resistor can not come in direct contact with the carpet in this location. There is actually a fair amount of void area for air movement and heat dissipation.


There is actually a blind pocket below the carpet where my switch sits. Already two slits in the carpet piece where a flap can be easily lifted, I have no idea why the slits are originally there. The slits are barely visible inside the highlight rectangle. I placed the switch right behind that.


I am on my second set of LED bulbs since the install. I started out with LEDs from superbrightleds.com and while they worked OK for about 6,000 miles, eventually they began flickering. Never went out, just flickered all the time. So I switched to LEDs provided specifically for license plate use from 42 draft designs.


I know they say they are not for MK V, but I am assuming that relates to the lamp out sensing, which the resistor takes care of. So far, just under 20,000 miles and they continue to work great for me.

42 draft designs said:
14.5v 39mm Fuse Style LEDs

Size 39mm long x 11mm diameter
Available Colors White
LEDs per unit 4
Typical Applications VW license plate lights. These LEDs are built to handle 14.5
volts. Our standard 12v 39mm fuse style LEDs will NOT last
in VW license plate lights. These 14.5v versions are built to
handle the excess voltage and the heat.
Price $6.50 per LED
 

felix_r32

racecar
Location
NYC
Very nice DIY but too much work for me. Mine is been under the bumper zip tied and no heat there since it is not touching any part of the car at all. Resistor is also water proof so no problem there also.
 

JetTurbo

geezer
Location
South Florida, USA
Car(s)
2018 GTi Autobahn 6M
Very nice DIY but too much work for me. Mine is been under the bumper zip tied and no heat there since it is not touching any part of the car at all. Resistor is also water proof so no problem there also.

Removing the panels is easier than it looks - I was pulling them no matter what to add other wiring anyway. :biggrin:

My long term concern with exterior mounting is corrosion. I have seen what a couple of winters usage can do to exterior mounted electrical mods if they are in any way exposed to road dirt and moisture. I feel pretty comfortable with the long term durability with an all interior mounted solution. Time will tell.

The RL-2525 Marker Lamp Load Resistor I purchased from superbrightleds.com was not exterior grade.

The simple heat shrink used on their offering appears to be inadequate corrosion protection.
Possibly it could be adequately protected with the addition of other material. Or another more appropriate piece is available for exterior use?
 
Top